The Planar Orthogonal Graph Drawing and Bend Reduction Tester
By: Joseph J. LaViola Jr.
Instructions
The GUI is made up of four buttons, a drawing area with a built in grid,
and a status bar. The four buttons allow for different mode changes
depending on the state of the applet. The drawing area is where the planar
orthogonal graphs are drawn and where the curves are created. The drawing
area is also where visual annotations of the graph take place. The status
bar shows various messages at different states in the program which help
users to understand the concepts at work. Look at this status bar for
valuable information.
Whenever the user wants to create or add on to an existing graph, he or
she must first click on the 'Create Graph' button. The status bar will
indicate that the applet is in graph drawing mode by displaying the message,
"The grid is ready for drawing a planar orthogonal graph". To draw vertices,
left click the mouse on the grid in the area that the vertex is to be drawn.
Notice that vertices always snap to grid coordinates. To draw edges, the
user must first enter edge mode by left clicking the mouse over the
given vertex that the edge is to start from. Moving the mouse will draw a
rubberbanding edge that snaps orthogonally to the horizontal or vertical
axes and also snaps to the grid lines. To finish the edge without bends,
perform another mouse click over a vertex that the edge is to stop at.
Remember, the ending vertex can only be a vertex that is directly horizontal
or directly vertical to the starting vertex. To create an edge that has
bends, left click the mouse close to where the bend should be placed.
Since the applet is still in edge mode, a new rubberbanding edge will
appear. As long as there is no left mouse click over an ending vertex, a
new bend will be created. To finish an edge that has bends, simply
left click on the vertex where the edge is to stop and the applet will
complete the edge and get out of edge mode. Using a series of vertex and
edge creations will create a planar orthogonal graph that is as simple or as
complex as desired.
To clear the graph, simply click the 'Clear Graph' button and the drawing will
be removed from the grid. Remember to click the 'Create Graph' button to
start making a new graph.
Once a graph has been created, a curve can be drawn to test minimization.
To enter curve mode, first click on the 'Draw Curve' button. The status bar
will display the message, "The grid is ready for drawing bend minimization
curves". To draw a curve, hold the left mouse button down and drag the
mouse to draw the desired curve. The curve automatically draws arrows
indicating the direction that the curve is being drawn. To end the curve,
simply release the left mouse button. Make sure that when drawing curves,
that the curve both enters and leaves the graph and that the starting and
ending points of the curve are in close proximitiy to each other. Note that when drawing a
curve and an intersection of a bend is required, make sure to pass over the
bend within a radial distance of an ordinary vertex. If this is not done,
the applet will think that the curve is being drawn over a normal edge.
Once a curve has been drawn over the planar orthogonal graph, the
bend reduction can be tested for the given curve. To check to see if the
curve can reduce the number of bends in the drawing, click on the 'Test Bend
Reduction' button. At this point, the status bar will display various
messages depending on the internal calculations being made. It is important
to watch the status bar at this time because it will display valuable
information. After the internal calculations have been made, three
possiblilties can occur. The first possibility is that the curve is not
valid because it has intersected a vertex at a 90 degree angle. If this
is the case, the status bar will display a message and the incorrectly
intersected vertex will blink. The second possibility is that the curve
is valid but the delta C value is greater than or equal to zero. If this
is the case, the curve cannot minimize the graph. The final possibility
is that there is a valid curve and it can minimize the graph. The status bar
will inform the user of how many bends can be removed. The graph will also be
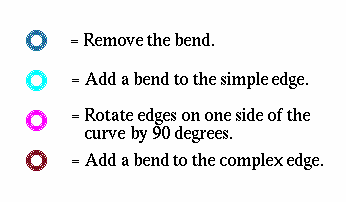
visually annotated to show what parts of the graph must be changed in order to minimize the
graph. These annotations are color coded with each color representing a
different instruction. Note that a simple edge is an edge without any bends
and a complex edge is an edge with bends. The color code is as follows:
 At this point you can take the information and reconstruct a minimized
graph.
At this point you can take the information and reconstruct a minimized
graph.
Send questions and comments to Joseph J
LaViola
Jr