Premise
Projectors have a long history of being used in essentially every professional environment, from elementary through graduate schools, to businesses, and government organizations. Despite technological advances over the past decades, projectors remain ubiquitous, and their interfaces continue to be troublesome to the degree that it is almost the default for one to expect projector delays -- at least for a minute or two. Moreover, any quick success with starting a projector often emits from the audience a sigh of relief, excitement, and surprise, as if to say “Ah, wow, magic. It works!” I attempt to address and rectify the common interface difficulties, first with initial ideas, followed by studying the pros and cons of the top-selling projectors in order to help create a final redesign of both the main projector unit and remote control.
Main question: can we design an interface (both projector unit and remote) that makes the overall process of displaying a device more intuitive and quick to do?
Initial Ideas
The typical usage of a projector is that one wishes to:
- optionally plug-in a device to the projector if it’s not already plugged in (e.g., a desktop computer may remain plugged into it as the default device)
- display said device’s video output via the projector.
Step 1 seems to be less perplexing to users; it’s easy to discern if one’s device is plugged in or not, and the most problematic part is that users may often not have the correct cable connector (e.g., HDMI or Apple plug). Thus, the problems typically lie in Step 2, with the confusion being “why isn’t it displaying my device?”
Based on my experience with projectors -- both first-hand and as an audience member -- within academia, government, and industry organizations, the most common problems seem to be, in decreasing order of frequency:
- difficulty in discerning if the projector is on
- difficulty in knowing which device is currently assigned to the projector
- difficulty in setting the projector’s display device to be the plugged-in device
- difficulty in discerning if the remote is working/ has battery power
The recurring theme of these problems is that the system’s state is poorly visible to the user.
Part of the difficulty is that projectors are often fixed to the room’s ceiling, making it difficult to see and touch the buttons/settings which might be useful for determining and adjusting the state of the projector. I would assert that the interface is clumsy to the degree that most users forfeit trying to understand the buttons on the projector unit, and at most embark on trying to press the more obvious ‘power’ button -- most exploration is done via the remote.
More problematic, the user often rightfully relies on the remote to navigate to the desired device. However, navigation is difficult, as projectors tend to display the “control panel” only in some quasi-display state -- the projector is showing its control panel in lieu of displaying any of displaying any of its possible devices. Adding to the confusion, users often have to cycle through all possible display device options, despite that fact that most of them may not be used/have any device plugged in.
This not only represents poor visibility, but also a bad mapping. A much more natural mapping would be useful.
For my initial design, I wish to improve all of these areas. The power is in the remote. It needs to be simple, yet also comprehensive enough to allow the user to easily discern all 4 points listed above. I believe most remotes are overly complicated and allow for extensive features. I plan to hide most of these features away within the “control panel” which all projectors have, in hopes of making the remote more obvious and intuitive.
The size of the remote is roughly the size of an Apple iPhone: 1.75” in width and roughly 4.5” in length, while being thin enough to house batteries.
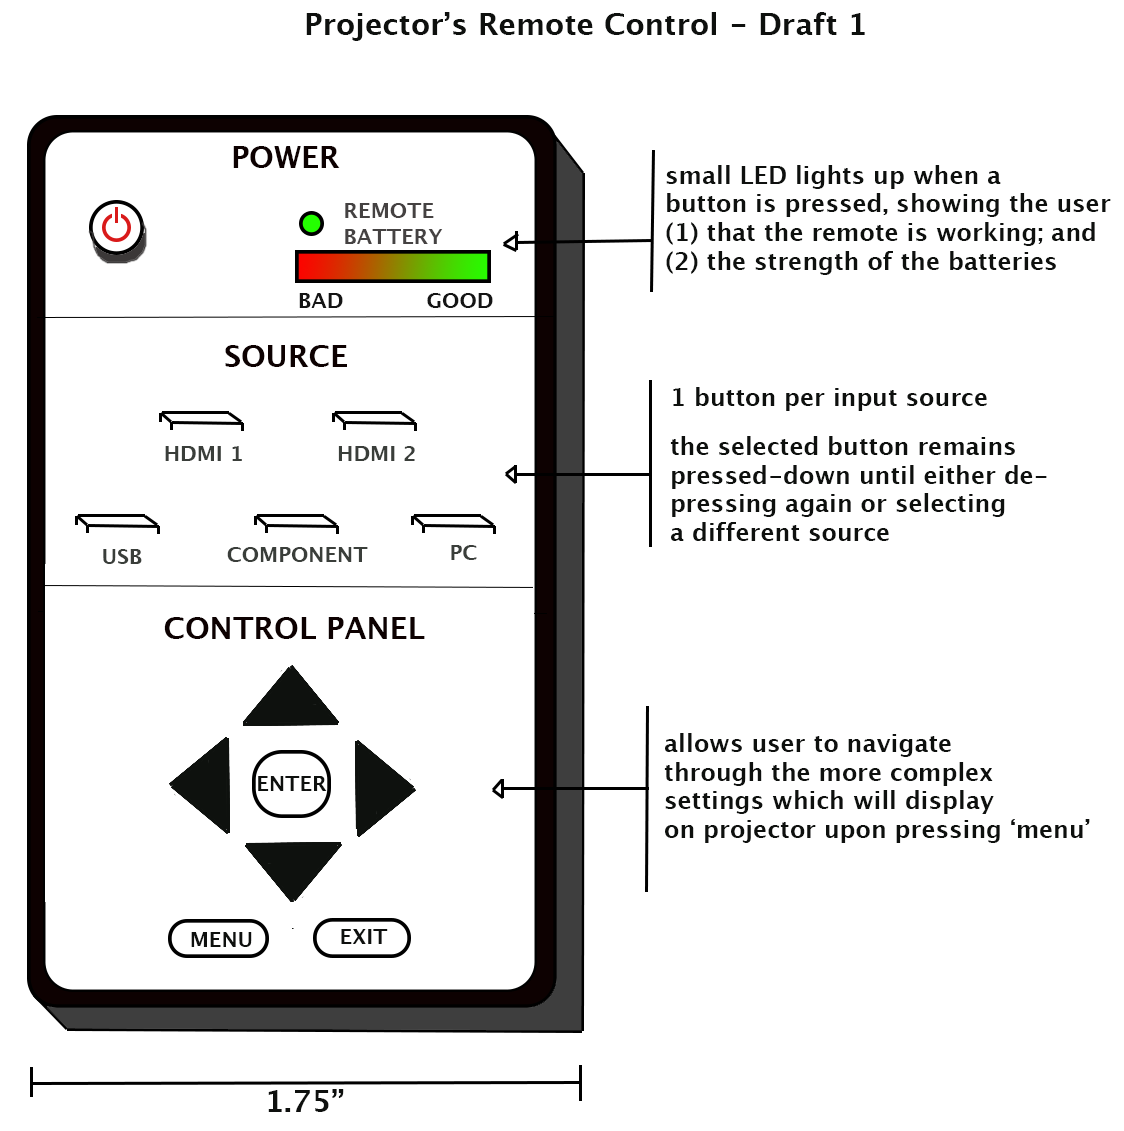
The first issue:
difficulty in discerning if the projector is on
This is improved by both the remote’s design and the project unit itself (not pictured yet). Specifically, since the remote has its own ‘remote battery’ indicator LED, it will be obvious to the user when/if the remote is functioning, in which case pressing the clear ‘power’ button will make it clear to the user that the projector is in fact on. Although it would be useful to have further feedback by having a ‘power on’ indicator LED on the remote to signify that the unit is actually on, such feedback technology to the remote is possibly non-existent. Regardless, the projector unit itself will illuminate a green ‘on/power’ LED when it’s on.
The second and third issues:
difficulty in knowing which device is currently assigned to the projector;
difficulty in setting the projector’s display device to be the plugged-in device
These are alleviated by the ‘source’ section on the remote. Specifically, the buttons are designed to be like the more traditional ones which were common on tape players -- once pressed, the physical button remains pressed-down until the user either presses it again or presses a different source button. This makes it easy for the user to discern which source is selected, and it also allows for the feature of leaving the projector on a certain device setting. For example, it may be the case that users typically use the HDMI port for connecting laptops, or maybe the ‘PC’ option if there’s a nearby desktop which everyone uses. In cases like this, it allows the convenience of having this button pressed indefinitely, thus alleviated the burden of users having to navigate or cycle through display options anytime one turns on the projector. Also, the text on the remote which lists the source (e.g., HDMI 1, VGA, etc) are printed below the buttons instead of on the buttons themselves. This is to help longevity, for if the text were on the buttons, the general wear and contact may cause the print to fade over time.
The fourth issue:
difficulty in discerning if the remote is working/ has battery power
This was already addressed in my first issue; there’s a designated ‘battery power’ LED which illiminates whenever a remote button is pressed.
Projector Unit’s Importance and Design
The simplified remote provides quick access to the important features, but it shouldn’t be the only lifeline for usage. If the remote batteries fail, the user should still be able to use the projector. For this reason, the design of the projector unit should also have the same, easy-to-use buttons which are both large and easy to press. Projectors often are attached to ceilings, but sometimes rest on table tops. They may also be installed at the very back of a room, from the ceiling. For this reason, putting buttons on the back of the projector would be a bad choice. Projectors will always be installed in the middle of an empty space, thus making their sides perfectly accessible, which is where I think the buttons should be placed.
Current Designs
We now look at the designs of the current, top models of projectors for the sake of:
- ensuring we accommodate sufficient features (in terms of how it would affect design and usability, not so much in the sense of rattling a list of latest technology that should be included)
- addressing negative characteristics that others have complained about.
The models I review are shown in order of least expensive to most expensive.
On Amazon.com, the top three models -- according to having both high ratings and popularity -- are:
- ViewSonic PJD5134 SVGA DLP Projector ($330)
- Epson VS230 SVGA 3LCD Projector (the latest model of the highly acclaimed VS220) ($340)
- BenQ W1070 1080P ($900)
The first two models represent the mid-range projector for everyday consumers, as their prices are around $350 USD. The last one (BenQ) was for contrast, as it’s in the prosumer category with a $900 price tag.
ViewSonic PJD5134
As an overview, the ViewSonic has nearly perfect reviews from its 335 online reviewers. It features many input sources: HDMI, dual VGA, composite, S-video, RS232. It also has 3D Blu-ray output, which is impressive, but not necessarily a technological feature that would affect design choices.
Projector Unit:
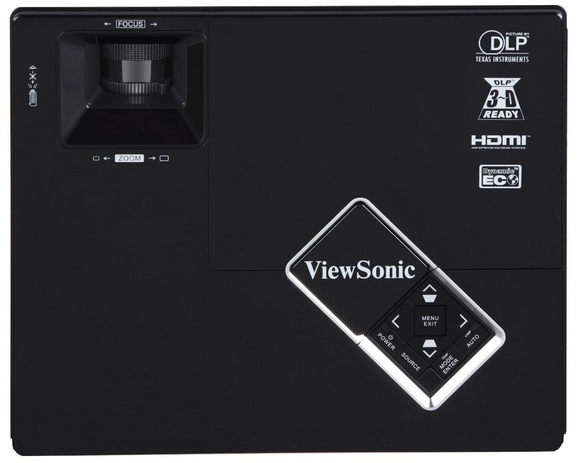
This is the bottom of the unit. Its design expects it to hang from a ceiling. The only navigation on the unit is seen here.
- seems pretty intuitive.
- good options: we can turn on/off the system, cycle through the sources, and navigate through the control panel
- small buttons (the bragging features/logos are the same size as the entire navigation, and there’s plenty of room left to make them bigger or to have more feedback displays)
- unclear if there’s feedback to tell the user if the system is on, other than light being emitted from the lens
- what is “auto” button?
- the lens is on the right-side, as opposed to being centered. Is this common? It may make installation harder for trying to ensure a proper placement which aligns with the screen.
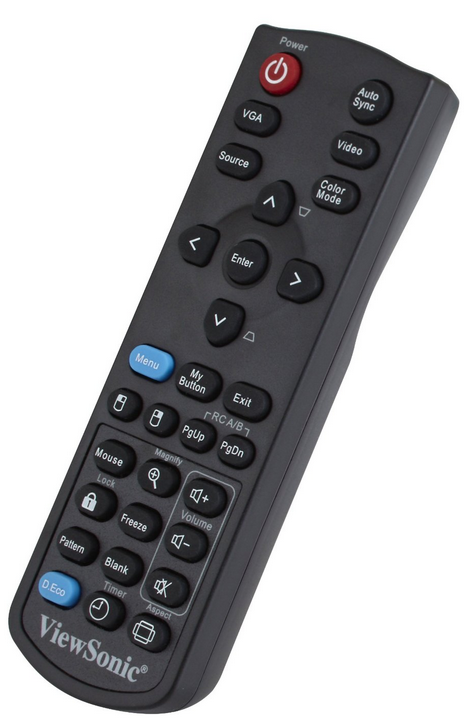
- seems pretty intuitive; has several buttons just like the ones in my initial design
- has useful buttons: Aspect, Color Mode, Volume (I forgot about situations where devices could play audio)
- many confusing buttons. What is My Button, Mouse, Blank, Pattern, Freeze, D. Eco, the 2 buttons with mouse icons, Lock, and when could we use Page Up and Page Down?
This was the highest rated projector. The bad reviews all concern technological complaints rather or faulty hardware, rather than design choices. The closest is that some claimed it was impossible to get a few features to work (e.g, 3D or HDMI output), in which case better feedback from the system might have helped in their cases, or it might have simply been faulty hardware.
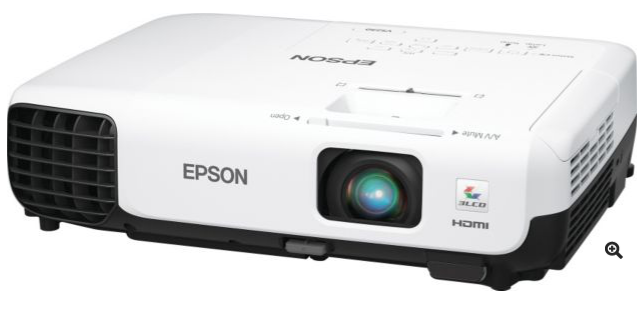
Again, the lens is to one side, not centered, which seems to be the accepted standard. There’s a fan on the other side, along with one on the side.
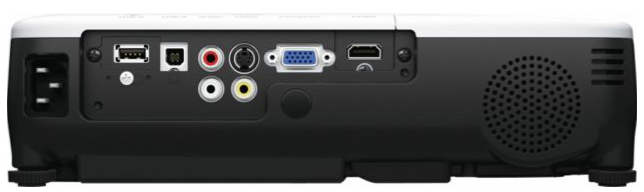
The connectors are on the back, along with what appears to be a speaker.
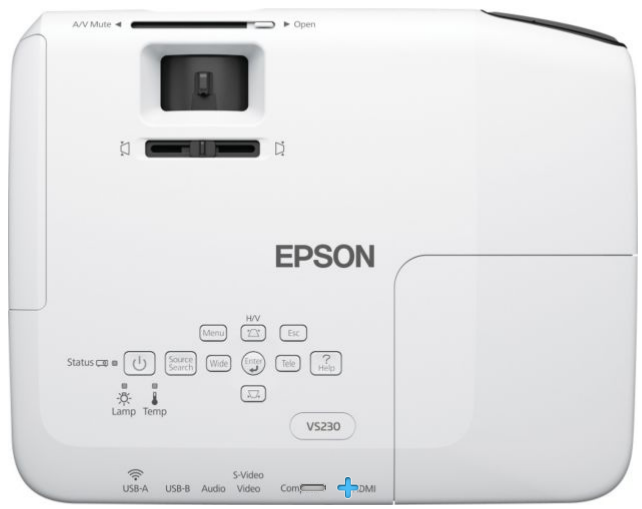
The buttons are on the bottom again.
Again, the pros and cons are the same as the last model, with the cons being:
- the buttons are incredibly tiny
- what are some of the buttons? (e.g, Tele, or the 2 Aspect Icons… are there only 2 options, are can you adjust ratio gradually?)
- There is a “Source Search” button, but can one not manually switch devices with 1 click. Instead one has to rely on this auto-search button? What if it continues to display a device you do not want?
A positive is that there’s an indicator LED to signify the state of the temperature and lamp, along with power. The LED’s are tiny though.
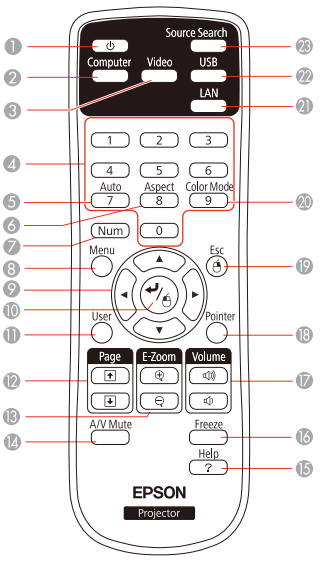
Here, the problems with the Source Search button seem to be alleviated, as the user can manually choose to select from the devices (e.g., Computer, Video, USB). The remote in general seems decent, but when/what are the numbered buttons for? Typically, if projectors display a television’s output, the channel selection is still done on the TV itself, and the projector simply relays the video. This seems odd, but I’m sure there’s some usage for it.
The manual is 208 pages long. That’s way too long.
BenQ W1070
This stylish projector has a nearly identical layout and faults as the cheaper $350 models:
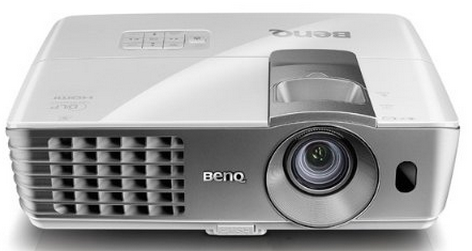

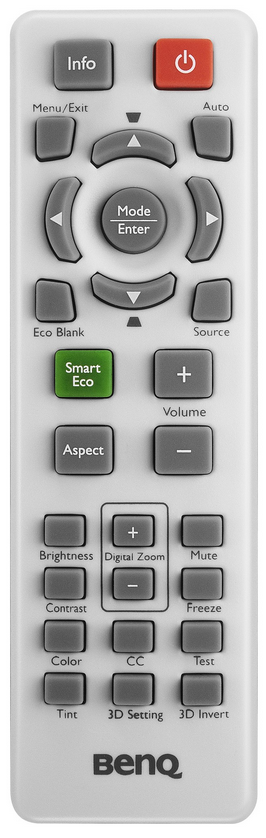
The remote has a great look to it and design to it, where there is a good trade off between minimalism and functionality. The buttons are big and look inviting to touch. However, a few buttons are still perplexing to the novice user. What is “Smart Eco,” and should I always use it? Does auto find the source plugged in, or does it (only?) select the color or aspect ratio for me automatically? What is Eco Blank? What is Test and Freeze, or 3D Invert?
As for the projector unit, why do models insist on having such tiny buttons? This model also doesn’t allow one to 1-click select any device; one must cycle through or rely on the projector to auto-find the correct device.
Epson PowerLite 3020
On the more expensive side, according to PC Magazine’s review of projectors, the Epson PowerLite 3020 is the best projector, and it comes with a hefty price tag ($1,900)
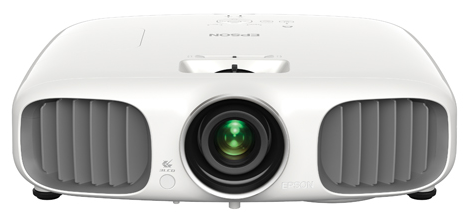
- the lens is centered, which is what seemed intuitive and preferred to me, so it’s great to see that others do in fact provide this.
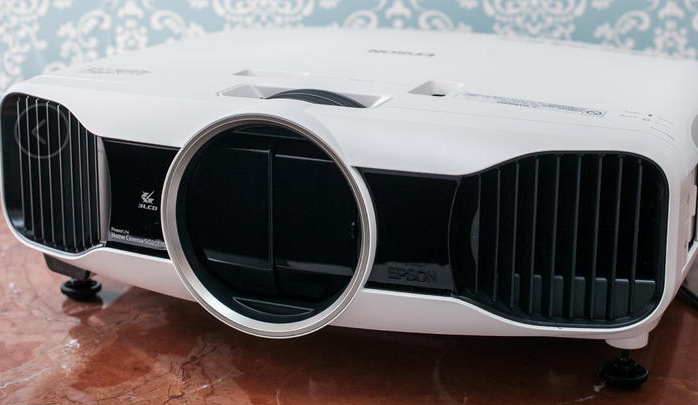
- the front has an effective dual vent system, which also looks stylish and is referred to as the “kidney grill” style a la BMW. Before seeing this model, this seemed intuitive to me and a further reason to have a lens centered as opposed to being on the right side.
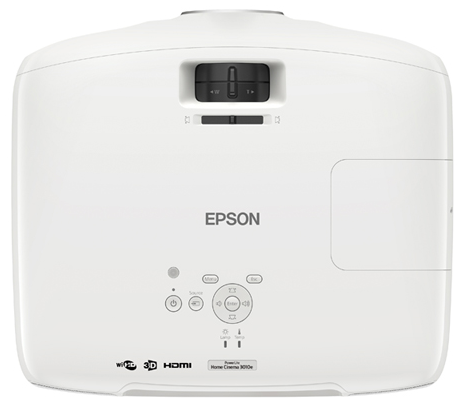
- like the previous Epson, there are designated LED lights for both lamp and temperature, along with one for the power.
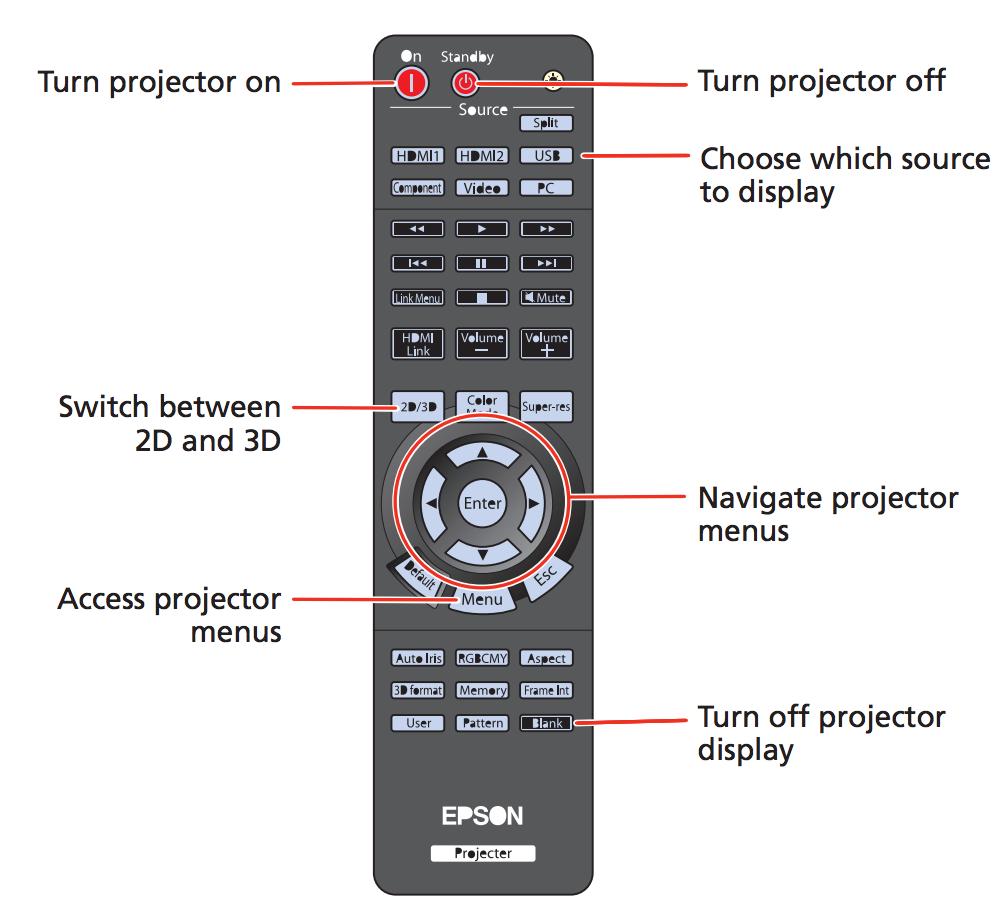
The remote has the favorable 1-button per device option that I advocated. However, again, there are many confusing buttons:
Demonstrating the complexity, the user manual is 96 pages long, which is actually a great improvement from Epson VS230’s 206 page manual.
Epson PowerLite 5020
C|NET very recently (February 2014) ranked their top projectors. Topping the list was the Epson 5020, which costs $2,300.

It’s disconcerting that the initial, most obvious design to me is only found in the most expensive, $2,300 model:
- controls on the side of the projector instead of clumsily trying to read and press from below
- centered lens on projector unit
- dual vents on the side of the projector
Notwithstanding, this top-of-the-line model still has design flaws. Although the sleek buttons on the side of the unit are stylish and have a sliding down to aesthetically hide them, the buttons are still relatively tiny. Further, when the projector is attached to a ceiling, it could be even harder to navigate if the door is sliding closed and the user can’t find the buttons.
Another downside of the buttons is that it’s so minimalist (only up/down left/right menu buttons) that the user is forced to do everything through the control panel, thereby essentially making the buttons rather useless -- imagine having continuously press the navigation buttons just to select a source, or fumbling with them to change something more complex. There should be a 1-touch button to select each source, along with other basic functionality that one would expect on the remote.
The remote control is identical from the previous Epson 3020 model.
Final Design
My initial design seems to be fruitful, and my foresight in the design of projector unit seemed to be a reality in only the most expensive models. But, there were technological features common across all models which I learned about and should accommodate for in my final design:
- viewing movies is common, so I need to have fast-forward, rewind, track buttons, as shown on the top Epson models.
- a MUTE button is obviously useful
- there needs to be a speaker on the projector unit, and it should be protected from touch (i.e., masked behind a grill)
- there needs to be proper venting
- excess lighting from the bulb should be minimally visible, which was sometimes a complaint in reviews
- accommodate space for a hanging bracket to attach to the projector
Further, my main design considerations include:
- good, natural mapping from user’s intentions to remote control options
- good conceptual model (user should not have to guess if they should fiddle with the projector unit itself or the remote; either would work just as they imagine)
- visible state of the system, regarding both the remote and projector
- minimize errors (via clear navigation, thus preventing users from entering a maze of wrong controls/adjustments)
- instant feedback for the user’s actions
- physical constraints to limit errors (especially regarding selecting source device)
- minimalism and aesthetics but with full functionality
I now describe how I implement each of the above design characteristics:
Good, Natural Mapping:
- the remote is simplified; the main task of selecting a display device source has 1 button per source (i.e., common buttons like Blank, Default, Pattern, Frame Int, Memory are gone)
- doing more complex tasks are often masked within the projector’s Control Panel, which displays on the projector and is accessible from both the remote and the unit itself
- all remote options are also available on the unit itself, in the event that the remote has run out of batteries or is misplaced
Good Conceptual Model:
- as mentioned in the last point above, regardless of the user’s mental model of which is the intuitive path to do something, he/she can do so via the remote or the unit itself, both of which are identical -- thus, there is no need to remember different paths or options depending on if the user is using either the remote or the unit to navigate
- the user’s mental model of “what’s the order that I need to do things in order to display device X” is natural and easy because the user will easily be able to discern if the unit is on (indicator lights on the side and bottom of unit), along with feedback on the remote. Further, the fact that the source buttons can remain pressed (a la tape recorder style) even when the unit is off will alleviate uncertainty of any ordering of events. This all ties in with the other design positives, too (e.g., visible state, minimize errors, instant feedback)
Visible State:
- the projector unit will have LED lights on the side if the device is on, along with the source that is currently selected, the lamp and temperature
- the remote has an LED light to indicate if the remote is working, and the strength of the batteries
- the remote has physical buttons which can remain pressed down (a la tape recorders) to indicate which source has been selected
Minimize Errors:
- confusing buttons on the remote are removed, and functionality for such are within the control panel. this prevents confusion and errors in doing the more common, basic tasks
- all of the easily visible states mentioned above helps remove errors regarding unnecessarily trying to adjust the system when there is no need, or when a device is/isn’t working
Instant Feedback:
- when user presses a button on the remote, the remote’s ‘battery strength’ LED illuminates to provide feedback:
- conveys the button was actually pressed
- conveys the remote is working
- conveys the strength of the batteries remaining
- the stay-pressed-down nature of the source buttons provides instant and lasting feedback, ensuring the user that their source is in fact selected (alleviated hassle of trying to figure out if the projector registered their choice or where the problem lies)
- as mentioned in ‘visible state,’ the projector unit will display LEDs to indicate the power, source selected, lamp, and temperature
Physical Constraints:
- as mentioned in ‘minimize errors,’ confusing buttons on the remote are removed
- the stay-pressed-down nature of the source buttons prevents the user from making mistakes such as wrongly switching sources too fast (due to thinking the projector isn’t working) before the display has correctly registered and displays their desired source.
- the grill over the speakers prevent user mishandling/ accidentally damaging the speaker
Projector Unit (front):
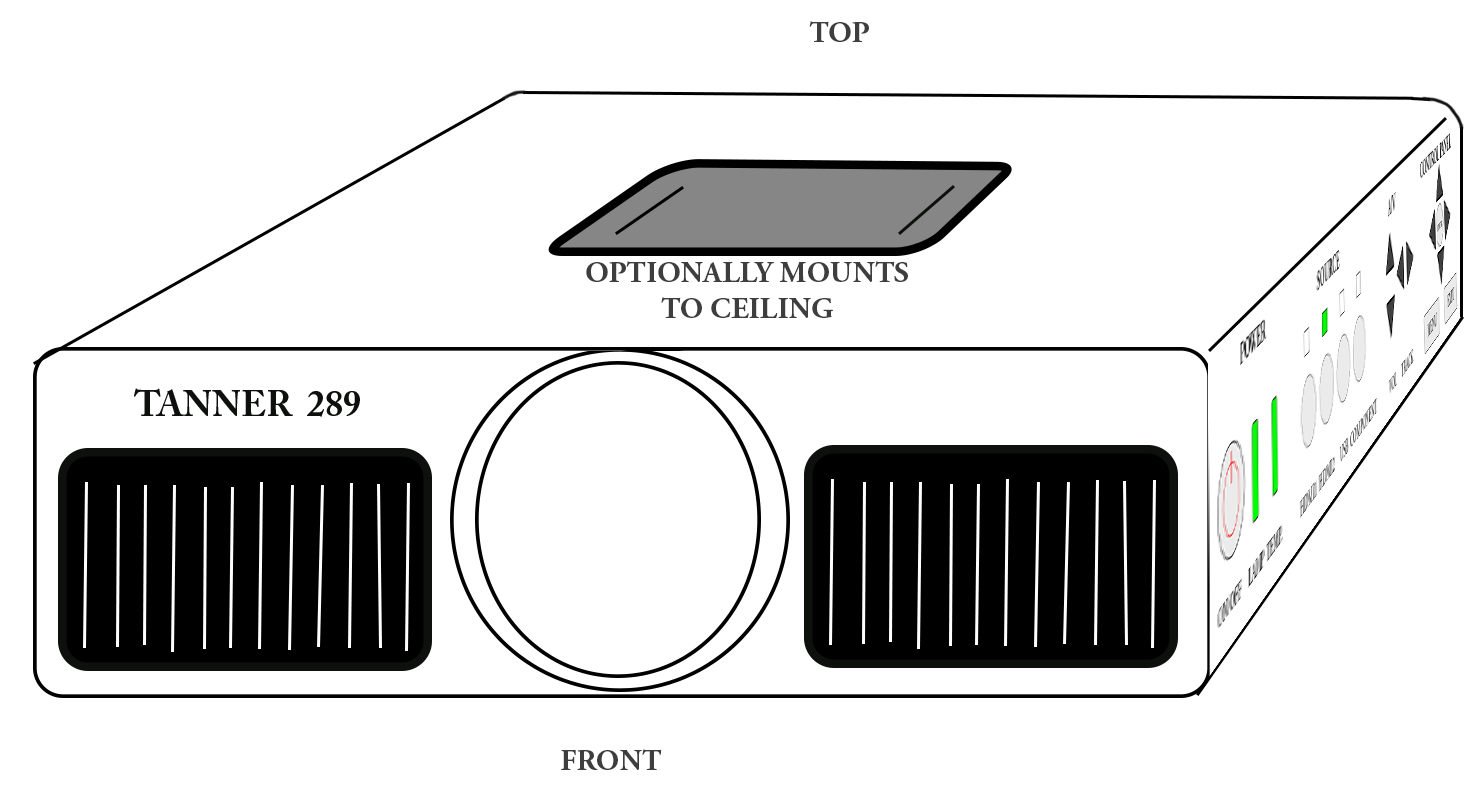
The majority of projectors have buttons on the bottom only, which forces one to hang the majority for the ceiling. With buttons on the side, the user has the option of resting the projector on a desk (more common for home-theater projectors) too. Also, the rounded display case prevents against any leaks of light at the edges, and the dual vents could have a zig-zagged barrier on the inside to bounce off any stray light from the bulb.
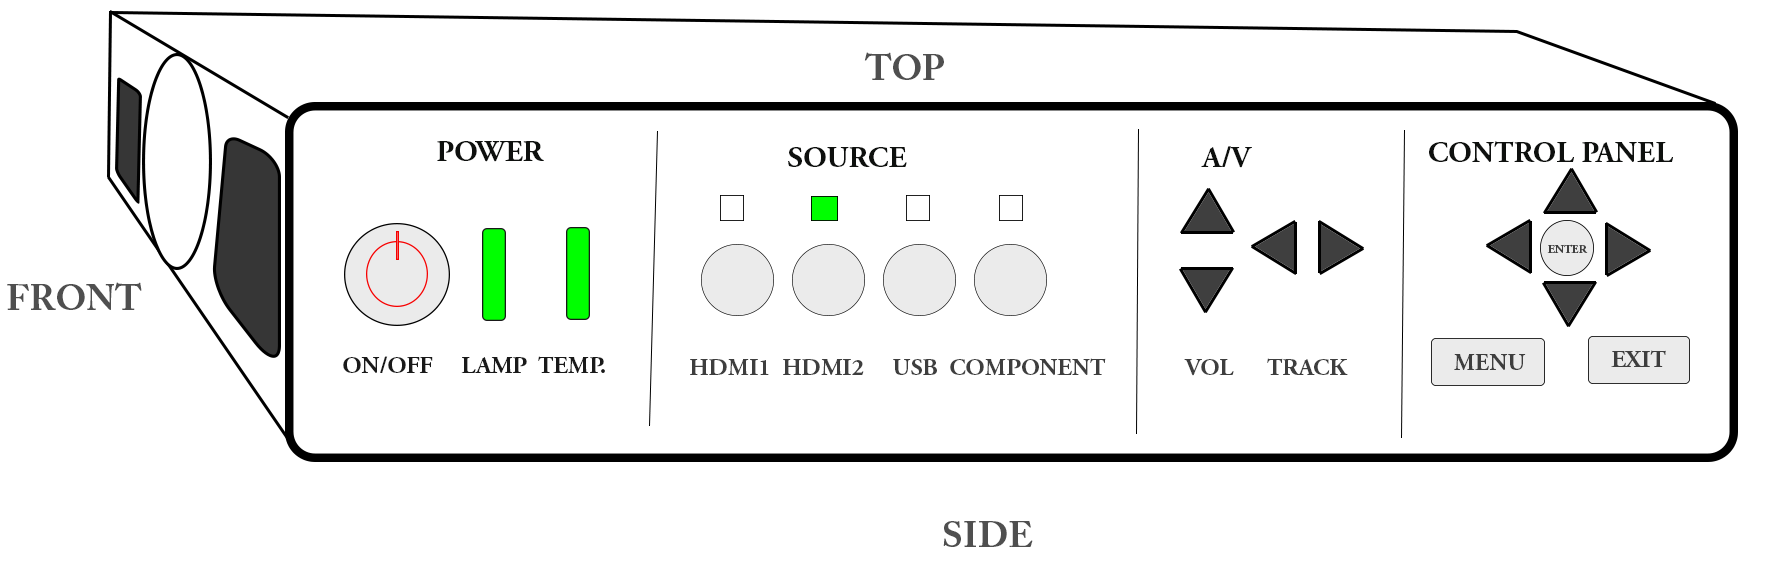
- The buttons are large (1.5” in diameter for the circular source buttons; and typical 6” in height for the entire unit).
- The on/off power button illuminates BLUE color when on, which is standard in many new devices.
- The lamp and temp LEDs illuminate green when status is good, red otherwise.
- The source section has 1 button for each, and the corresponding LED will illuminate green when it is selected (and stay on for the duration).
- The menu and exit buttons are the soft style buttons like on the BenQ system
Remote Control:
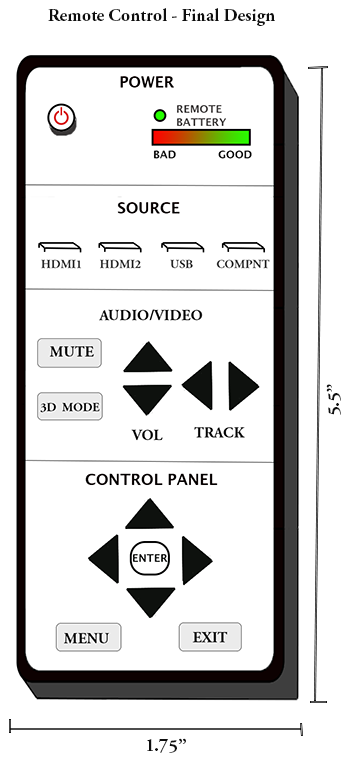
Having looked at many models, 3D capabilities is a common, highly appreciated feature; hence the designation for its own single-press button to switch between 2D and 3D mode. I’ve also added the default, useful ‘MUTE’ button. Last, the addition of track fast-forwarding and rewinding are now present within the ‘AUDIO/VIDEO’ section.