Assignment 0: Setup
Released: September 8th, 6:00pm ET
Due: September 15th, 11:59pm ET
Introduction
We are on a mission to create the most delicious donut in the world, but first we must collect all the ingredients… not just any ingredients, but the best quality ingredients! This is the setup assignment so it is comparatively much shorter; You will be setting up the CS1951v Development Environment for the programming assignments in the course, and ensuring that you are completely setup with everything before we start!
Throughout the rest of the course we will be working towards building a hypermedia system, which will involve understanding what hypertext/hypermedia and its principles are. We will also become famliar developing a modern full-stack application for the web using the MERN stack - MongoDB, Express, React, Node.
We look forward to getting started! If you have any questions, please feel free to reach out to any of the TAs via the slack channel outlined below and/or come to TA hours.
Checklist
Join the Slack channel

Slack will be our main form of communication throughout the semester. Course updates and other announcements will be sent through our Slack, and this Slack workspace will also allow you to interact with other students and the teaching staff. Channels have already been set up for lectures and sections, as well as for the individual components of our tech stack (React, MongoDB, etc).
Slack will also function as our Piazza/EdStem for this course. Topic-specific questions can be posted in the corresponding channel and will be answered by the staff. Direct messaging can also be used for personal questions and more informal communications with the TAs and professors.
Click here to join our workspace! Once you do, send a message in the #introductions channel briefly introducing yourself so we can check you off for joining the Slack. Include your name, where you’re from, and some of your interests / hobbies!
Sign the Collaboration Policy
All of our course assignments will be project- and assignment-based, so it is very important that all of the work that you do this semester is your own. That being said, general discussions with other students about lecture material and overall concepts are not only allowed but encouraged. We want everyone to clearly understand what is allowed to be openly discussed during the semester, so please read closely and complete the collaboration policy agreement here.
CS1951v Development Environment
MERN
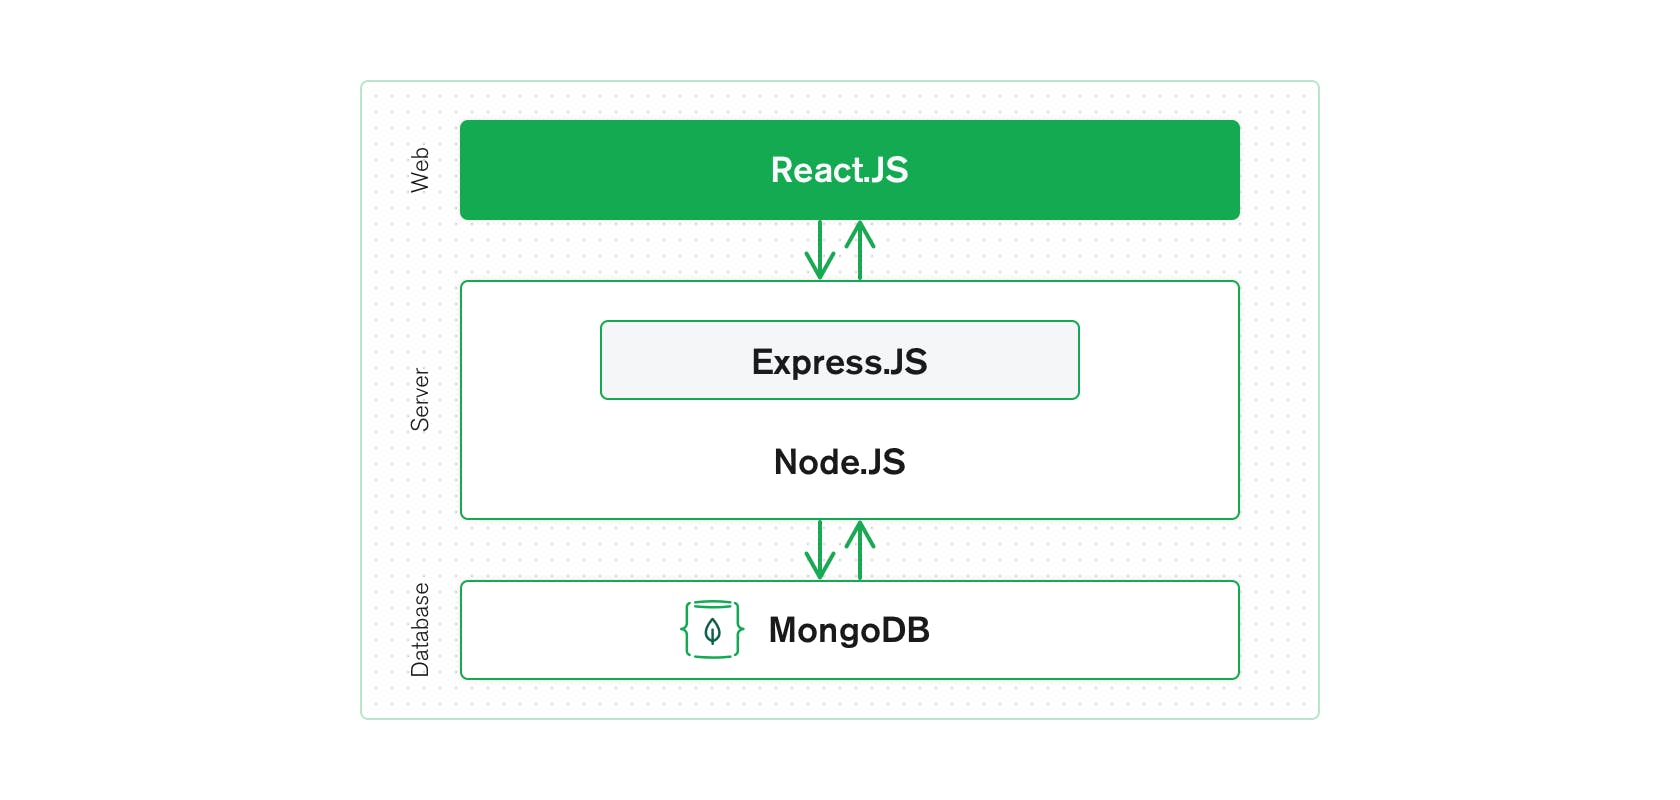
In CS1951V, we will be developing full-stack web applications using the MERN stack, which stands for MongoDB, Express, React, and Node. The MERN architecture allows you to easily construct a 3-tier architecture (frontend, backend, database) using just JavaScript/TypeScript and JSON. The interactions between these technologies are shown below:
Using this stack will allow you to build and deploy full-stack applications easily and efficiently, and will also give you firsthand experience working with these widely used technologies. For a more detailed introduction to the MERN stack, which we will be using for programming assignments through the course, click here.
We settled on the MERN stack so that our small staff can provide high-quality support to students working on assignments and the final project. We recognize there are many great libraries, frameworks, and languages out there that could be used to implement a hypertext / hypermedia system. If you are interested in using another technology for the final project please reach out to us ASAP and we will be happy to consider it.
Typescript
In addition to the MERN stack, we will be using TypeScript as our primary programming language throughout the course. It is more organized, and makes debugging a far easier task for both you and the TAs!
Typescript is a strict syntactical superset of JavaScript. It adds static type checking to JavaScript, so if you have experience with JavaScript but not Typescript, there’s no need to worry! Additionaly, by learning and using TypeScript, you will also naturally become more familiar with JavaScript. You can learn more about static type checking and TypeScript here if you have not used either TypeScript or JavaScript, and here if you are already familiar with JavaScript.
Basic example of TypeScript vs. JavaScript
In JavaScript, the following code would not return an error because it allows accessing properties which aren’t present. In TypeScript, due to the static type checking, it would!
const ingredients = { sugar: 10, flower:20, eggs:2 };
const dough = ingredients.sugar + ingredients.folwer + ingredients.eggs;
TypeScript would return the following error:
Property 'folwer' does not exist on type '{ sugar: number, flower: number, eggs: number }'. Did you mean 'flower'?
Setting Up Your Development Environment
The following will show you how to set up a MERN stack development environment. There are a number of technologies that you will need to install, so please follow the instructions below carefully! The technologies that we will be using in this course are as follows:
- Visual Studio Code
- Node / Node Package Manager (NPM)
- Yarn
- Git Command Line Interface (CLI)
- Code styling / Linting
Disclaimer: If you run into errors during any of the installations found in this assignment, your first step should be to attempt to debug the issue yourself using Google. If you cannot figure out the problem yourself, you should then reach out to the TAs via the mentioned Slack channel or come to TA hours.
Visual Studio Code
We highly recommend using Visual Studio Code for course assignments. Visual Studio Code is a code editor that is optimized for building and debugging modern web applications. On top of this, it has built-in Git commands that will make it easier to work with Github Classroom, and has a bunch of incredibly helpful extensions that can be used to improve your workflow.
Note: If you don’t have Visual Studio Code, it will be more difficult for the TAs to give you effective support during hours. Also, you will have to configure linting on your own.
Download Visual Studio Code here.
Opening a Project and Terminal in Visual Studio Code
Once you have Visual Studio Code installed, you can open a project by selecting File -> Open..., and then selecting the source folder of a given project.
To open a terminal in that project’s directory, select Terminal -> New Terminal, and a new terminal window will appear at the bottom of your editor. This terminal can be used to run commands in Visual Studio Code itself without having to leave your editor.
Note: You can switch the type of terminal (zsh, bash, PowerShell) by clicking the down arrow icon near + icon in VS Code terminal.
Now that you have your IDE setup, let’s install the software environment we will be using throughout the semester!
Installing required plugins
To make sure we take full advantage of VS Code, there are a few required and optional plugins to install:
Feel free to explore other VS Code plugins and themes you like! The GitHub theme is a personal favorite.
Configuring VS Code
This is a critical step in setting up your development environment, so don’t skip it!
Turn on Autosave
- Click the
Manage ⚙️ icon on the bottom-left side of the editor, and select Settings. Alternatively, use (Ctrl + ,).
- Locate the
Files: Auto Save option and select afterDelay. This will autosave the code whenever you pause editing.

Set Tab Size
- Locate the
Editor: Tab Size option and input 2. This is the industry standard tab size for JavaScript.

Configure default formatter
- In the search bar, search the keyword
format.
- Locate the
Editor: Default Editor option and select Prettier Eslint.

- Underneath the
Default Formatter option, locate Editor: Format On Save option. Make sure the box is selected, as this will automatically reformat your code and ensure you have the right style on each save.

Node / Node Package Manager (NPM)
What is Node?
Node is a JavaScript runtime built in Chrome’s V8 engine. In other words, Node is JavaScript outside of the browser. Traditionally, JavaScript can only be executed within the browser, which is the client-facing side of web applications that every user has access to. However, Node allows you to run JavaScript code on the backend of your application as opposed to on the browser itself.
This allows you to use JavaScript for both the front and backend components of your web applications, making development much simpler and more straightforward!
All Node applications should contain a package.json file which specifies:
- The packages on which your project depends
- Versions of a package that your project can use
- Additional metadata such as author, description, and useful scripts for building and running the application
macOS Installation
- Install Homebrew by copying the commands that are outlined here.
- Install Node by running the following in your terminal:
brew install node
Note: If you have a Mac with an M1 processor, homebrew does not have a stable release. You can download the latest version of Node / NPM here.
If given the option, install Node ^v16, this is because we want to stay up to date with the latest technologies. You may need to restart your shell after installation before the node command is recognized.
If you’re having trouble or are working on another system, you can find alternative ways of installing Node on your system by following the guide here.
To verify that you have installed Node correctly, run the following line of code in your terminal:
node --version
If there is no error, you have installed Node correctly!
Recommended tool if you need to run multiple versions of Node / NPM
We are requiring the latest version of Node / NPM for this course (v16^) but we understand if you need to run multiple version if you have projects that you are working on that does not support the latest version of Node.
Luckily there is a tool that allows us to easily switch between versions of Node / NPM. It is called NVM (Node Version Manager). There is a Linux/MacOS version available here, and a Windows version available here.
The readme in them is straightforward, and should allow you to easily switch between Node versions. Let us know if you have any questions getting this setup!
Here are the basic terminal commands once you have it installed:
nvm list: Get a list of the versions currently installednvm install node: Install the latest available version (should be 16.9.0)nvm use node: Use the latest version of node
You will need to reinstall global packages for each version of Node / NPM that you have (eg. Yarn)!
If you are having trouble installing Node, please come to TA hours or seek help in the #nodejs Slack channel.
Yarn
Yarn stands for Yet Another Resource Negotiator and it is a package manager just like npm. It was developed by Facebook and is now open-source. The intention behind developing yarn (at that time) was to fix performance and security concerns with npm. If you are interested, here is an article that outlines the difference between npm and yarn.
Yarn is a JavaScript package manager that aims to be speedy, deterministic, and secure. The Yarn Command Line Interface (CLI) will parse the package.json file in a Node application and will automatically reach out to the correct online registry and install that package onto your local machine. Its main advantage is its avoidance of any problems related to different versions of Node.js system modules on which the project will be mounted. Yarn should reduce the number of package-management-related issues you will have to deal with throughout the semester.
So why need a package manager in the first place? Web applications usually use a great number of third-party packages and libraries so we don’t have to write everything on our own. Instead of manually installing the packages one-by-one, we use the package manager to automate this process. It’s really quick!
In order to get consistent installs across machines, Yarn needs more information on the dependencies you configure in your package.json. Specifically, Yarn needs to store exactly which versions of each dependency were installed. To do this, Yarn uses a yarn.lock file in the root of your project. Your yarn.lock file is auto-generated and should be handled entirely by Yarn. As you add/upgrade/remove dependencies with the Yarn CLI, it will automatically update your yarn.lock file. Do not edit this file directly as it is quite easy to break something!
Installation
-
Install: To install yarn, run the following npm command. It should not matter which directory you are in:
npm install --global yarn
-
Verify: To verify, the following terminal command should not return an error.
yarn --version
If you are having trouble installing Yarn, please come to TA hours or, since Yarn is a node package manager, seek help in the #nodejs Slack channel.
Important! Yarn commands we use
- Built in commands:
To install all dependencies in one-click: yarn install
To add an additional dependency: yarn add <dependencyName>
To remove an existing dependency: yarn remove <dependencyName>
- Custom commands in 1951v
The custom commands are all defined in package.json.
To start the service: yarn start
To identify linting issues in code and autoformat the entire codebase, run: yarn lint
To see your test coverage, run: yarn coverage
To format the code base without lint check: yarn format
Git Command Line Interface (CLI)
Simply put, Git is a version control system that lets you manage and keep track of your source code history. GitHub is a cloud-based hosting service that lets you manage Git repositories. If you are brand new to GitHub, consider watching this video.
Note: CS32 also has a very useful tutorial on how to use Git, which you can find here. If you do not know how to use Git, we strongly recommend that your use it.
Installation
- Install the Git CLI here.
- For Windows users, a more detailed installation guide can be found here.
- To verify that you have installed correctly, the following terminal command should not return an error.
[Optional] Desktop App
Alternatively, you can use the Github Desktop app, which is free to download here. This allows you to work with Github without having to manually run Github commands in your terminal. Some people have a preference for this, so feel free to check it out!
Fork is a more advanced alternative that you could also consider.
If you are having trouble installing the Git CLI, please come to TA hours or seek help in the #git Slack channel.
Checking Your Environment Setup
Now that you have everything installed, we need to check that everything is working properly! To do so, we have created an assignment on GitHub to test both a React frontend environment and a Node/Express backend environment. Accept the assignment here. If you can successfully run both of the applications after cloning their repositories and installing the related packages, then you’re good to go!
To-Do: Clone the assignment0-setup repository onto your computer. We recommend that you create a cs1951v folder so that this assignment, as well as others are organised into one folder - note this is not a technical requirement but just an organizational recommendation.
Now that you have made a copy of the assignment0-setup repository on your local machine, you can open it with VS Code. Once you have opened it, make sure your active repository is the assignment’s root directory - in this case: assignment0-setup-[<yourGitHubUsername>].
For this assignment and throughout the course we will be differentiating between the frontend and backend in the same way: All of the backend code will be stored in a folder called server and all of the frontend code will be installed in a folder called client. Our recommendation is to have one terminal open for each whenever you are working on the assignments!
Disclaimer: The following repository uses technologies from the MERN stack mentioned above, specifically React for the frontend and Node/Express for the backend. We understand that we haven’t introduced these topics yet. Please do not worry about understanding the entire codebase of these starter applications at this moment as this is just for Setup. We will be providing in-depth resources on these topics before you start using these technologies yourself.
Backend
Now that your frontend environment is correctly set up, let’s verify that your backend environment is correctly set up as well. It contains another simple App file that uses an Express router to send a request to a local address. As before, you will be cloning this project and running it on your own computer in order to verify that your backend environment is set up correctly.
-
Open a new terminal window. cd into the server folder, which is where we handle the backend environment in our projects.
Note: Some projects may seperate backend and frontend into seperate repositories.
-
We want to install the necessary backend applications packages and build the application with the following Yarn commands:
yarn install
yarn start
You should see some error messages like this - scary, right?
andy@DESKTOP-JDJ38IV MINGW64 /d/code/setup/server (main)
$ yarn start
yarn run v1.22.5
$ nodemon src/app.ts
[nodemon] 2.0.12
[nodemon] to restart at any time, enter `rs`
[nodemon] watching path(s): *.*
[nodemon] watching extensions: ts,json
[nodemon] starting `ts-node src/app.ts`
Server started on port undefined
MongoServerError: bad auth : Authentication failed.
    at MessageStream.messageHandler (D:\code\setup\server\node_modules\mongodb\src\cmap\connection.ts:740:20)
    at MessageStream.emit (events.js:400:28)
    at MessageStream.emit (domain.js:470:12)
    at processIncomingData (D:\code\setup\server\node_modules\mongodb\src\cmap\message_stream.ts:167:12)
    at MessageStream._write (D:\code\setup\server\node_modules\mongodb\src\cmap\message_stream.ts:64:5)
    at writeOrBuffer (internal/streams/writable.js:358:12)
    at MessageStream.Writable.write (internal/streams/writable.js:303:10)
    at TLSSocket.ondata (internal/streams/readable.js:726:22)
    at TLSSocket.emit (events.js:400:28)
    at TLSSocket.emit (domain.js:470:12) {
  ok: 0,
  code: 8000,
  codeName: 'AtlasError'
}
This happens because we haven’t set up the environment variables yet. What is an environment variable?
Sometimes we have sensitive information that we need to include in our code - your password, your SSH key, or even the port number that your app is running on - that’s the reason why we keep those information in a seperate .env file and call them environment variables.
-
Kill the current process by pressing Ctrl+C into the terminal window.
Use the following command to create the .env file:
- On Linux
touch .env
- In Windows Powershell
New-Item .env -type file
The following snippet contains the environment variables we will use this semester. Open the .env file we just created and then copy and paste this snippet:
DB_USERNAME='student'
DB_PASSWORD='cs1951v'
PORT=8080
TSC_COMPILE_ON_ERROR=true
ESLINT_NO_DEV_ERRORS=true
Now, let’s try it again - run yarn start now and that should start a server running on localhost:8080. Type the URL localhost:8080 into your web browser, and if you see the message Your backend setup is complete!, then your backend environment is set up correctly! Since we are going to use our backend service later, don’t kill the process yet!
Frontend
To test your frontend environment setup, we will test that your setup works with a very basic React application. It contains a simple App.tsx file that displays some HTML using React. You will be running this app on your machine in order to verify that your development environment is set up correctly.
-
Do not kill the backend process just yet. Open a new terminal and cd into the client folder, which is where the frontend code lives:
cd client
Now that you are in the correct folder, you can install the necessary packages for the project with the following Yarn command:
yarn install
Please make sure your backend is running at the same time! Otherwise your frontend will not respond to any request you are about to make.
-
Create an .env file in the client folder with touch .env. Paste the following variables into the file.
TSC_COMPILE_ON_ERROR=true
ESLINT_NO_DEV_ERRORS=true
Linting
To test whether your linter is working, please navigate to client > src > App.tsx. You should now see a file that is intentionally formatted incorrectly. Press Ctrl+S to save the file. You should now see the file going through some stylistic changes, and the code format should look much cleaner.
If you do not see any changes after you save, that means some steps in your linting set up is not completed. Please try it again, or enter yarn lint to manually perform the reformat.
If you cannot get the linter to run, please come to TA hours or seek help in the #assignments Slack channel.
-
Now that we are in the correct folder and have the necessary packages installed, we can run the frontend code! The web application can be launched using the Yarn command:
yarn start
Note: For people who have used npm before, this is the same as npm start.
Running this command should automatically open up localhost:3000 in your web browser. If it doesn’t, you can manually open it by going to the URL localhost:3000 in your web browser.
Note: To stop running the React web application hit Ctrl+C in the terminal that it is running from.
If you see the following message, your frontend environment is correctly set up, and you should be set up for the rest of the course!
If you cannot get the application to run, please come to TA hours or seek help in the #react Slack channel.
Deploying your bio to the CS1951v Website!
Now, you can get some practice working with TypeScript objects! But more importantly, you can get to know your classmates. You will be making a basic API call to deploy your profile onto our course website!
First, go to client > src > api > profile.ts and read the IProfile interface. Then, you should properly fill out this placeholder text:
export const profile = {
role: "student",
name: "Your name",
}
with all your information!
If you need a way to upload your profile or donut image, you can use https://imgur.com/upload, and then right click the image > “Open image in new tab” to get the direct link URL ending in .png, .jpg, etc. Make sure your url ends with .png, .jpg, .jpeg, or .gif, otherwise it will not pass our regex check!
Throughout this course, we will be following the convention of prefixing our interface names with I. This helps to distinguish an interface from an instance of that interface (e.g. the interface IProfile v.s. the instance profile). This is not the only way to distinguish interfaces, but it is very clear!
Now, you can see Typescript in action! To tell the typechecker that profile should be an instance of IProfile, you can add a type annotation like so:
export const profile: IProfile = {
}
Now, if you are missing a field or one of the fields is an incorrect type, you will get a type error! This is an example of how Typescript prevents bugs and makes your Javascript codebase significantly easier to maintain.
If you edited your profile you will now see a profile and a button at the same localhost:3000 site that you had set in your frontend environment setup! If you have saved the profile.ts file, then it should look something like this:
If that works, and if you are happy with your profile, you are ready to deploy your bio to the course website! Click the “Deploy your bio to the website” button, and check the course website to see you and your classmates :)
If you get an error, check that your profile object has valid data for all the required fields. If you’re stuck for more than a few minutes, message in the #assignments channel!
Congrats!
You’re now set up for the rest of the programming assignments 😎 Happy coding!
Happy coding but don’t forget the reading 📚 assignments!
⬅️ Return to course website
Assignment 0: Setup
Released: September 8th, 6:00pm ET
Due: September 15th, 11:59pm ET
Introduction
We are on a mission to create the most delicious donut in the world, but first we must collect all the ingredients… not just any ingredients, but the best quality ingredients! This is the setup assignment so it is comparatively much shorter; You will be setting up the CS1951v Development Environment for the programming assignments in the course, and ensuring that you are completely setup with everything before we start!
Throughout the rest of the course we will be working towards building a hypermedia system, which will involve understanding what hypertext/hypermedia and its principles are. We will also become famliar developing a modern full-stack application for the web using the MERN stack - MongoDB, Express, React, Node.
We look forward to getting started! If you have any questions, please feel free to reach out to any of the TAs via the slack channel outlined below and/or come to TA hours.
Checklist
assignment0-setupin GitHub classroomNote: If you cannot make either of these lab times, please send an email to cs1951vheadtas@lists.brown.edu.
Join the Slack channel
Slack will be our main form of communication throughout the semester. Course updates and other announcements will be sent through our Slack, and this Slack workspace will also allow you to interact with other students and the teaching staff. Channels have already been set up for lectures and sections, as well as for the individual components of our tech stack (React, MongoDB, etc).
Slack will also function as our Piazza/EdStem for this course. Topic-specific questions can be posted in the corresponding channel and will be answered by the staff. Direct messaging can also be used for personal questions and more informal communications with the TAs and professors.
Click here to join our workspace! Once you do, send a message in the #introductions channel briefly introducing yourself so we can check you off for joining the Slack. Include your name, where you’re from, and some of your interests / hobbies!
Sign the Collaboration Policy
All of our course assignments will be project- and assignment-based, so it is very important that all of the work that you do this semester is your own. That being said, general discussions with other students about lecture material and overall concepts are not only allowed but encouraged. We want everyone to clearly understand what is allowed to be openly discussed during the semester, so please read closely and complete the collaboration policy agreement here.
CS1951v Development Environment
MERN
In CS1951V, we will be developing full-stack web applications using the MERN stack, which stands for MongoDB, Express, React, and Node. The MERN architecture allows you to easily construct a 3-tier architecture (frontend, backend, database) using just JavaScript/TypeScript and JSON. The interactions between these technologies are shown below:
Using this stack will allow you to build and deploy full-stack applications easily and efficiently, and will also give you firsthand experience working with these widely used technologies. For a more detailed introduction to the MERN stack, which we will be using for programming assignments through the course, click here.
We settled on the MERN stack so that our small staff can provide high-quality support to students working on assignments and the final project. We recognize there are many great libraries, frameworks, and languages out there that could be used to implement a hypertext / hypermedia system. If you are interested in using another technology for the final project please reach out to us ASAP and we will be happy to consider it.
Typescript
In addition to the MERN stack, we will be using TypeScript as our primary programming language throughout the course. It is more organized, and makes debugging a far easier task for both you and the TAs!
Typescript is a strict syntactical superset of JavaScript. It adds static type checking to JavaScript, so if you have experience with JavaScript but not Typescript, there’s no need to worry! Additionaly, by learning and using TypeScript, you will also naturally become more familiar with JavaScript. You can learn more about static type checking and TypeScript here if you have not used either TypeScript or JavaScript, and here if you are already familiar with JavaScript.
Basic example of TypeScript vs. JavaScript
In JavaScript, the following code would not return an error because it allows accessing properties which aren’t present. In TypeScript, due to the static type checking, it would!
TypeScript would return the following error:
Property 'folwer' does not exist on type '{ sugar: number, flower: number, eggs: number }'. Did you mean 'flower'?Setting Up Your Development Environment
The following will show you how to set up a MERN stack development environment. There are a number of technologies that you will need to install, so please follow the instructions below carefully! The technologies that we will be using in this course are as follows:
Disclaimer: If you run into errors during any of the installations found in this assignment, your first step should be to attempt to debug the issue yourself using Google. If you cannot figure out the problem yourself, you should then reach out to the TAs via the mentioned Slack channel or come to TA hours.
Visual Studio Code
We highly recommend using Visual Studio Code for course assignments. Visual Studio Code is a code editor that is optimized for building and debugging modern web applications. On top of this, it has built-in Git commands that will make it easier to work with Github Classroom, and has a bunch of incredibly helpful extensions that can be used to improve your workflow.
Note: If you don’t have Visual Studio Code, it will be more difficult for the TAs to give you effective support during hours. Also, you will have to configure linting on your own.
Download Visual Studio Code here.
Opening a Project and Terminal in Visual Studio Code
Once you have Visual Studio Code installed, you can open a project by selecting
File -> Open..., and then selecting the source folder of a given project.To open a terminal in that project’s directory, select
Terminal -> New Terminal, and a new terminal window will appear at the bottom of your editor. This terminal can be used to run commands in Visual Studio Code itself without having to leave your editor.Note: You can switch the type of terminal (zsh, bash, PowerShell) by clicking the
down arrowicon near+icon in VS Code terminal.Now that you have your IDE setup, let’s install the software environment we will be using throughout the semester!
Installing required plugins
To make sure we take full advantage of VS Code, there are a few required and optional plugins to install:
Feel free to explore other VS Code plugins and themes you like! The GitHub theme is a personal favorite.
Configuring VS Code
This is a critical step in setting up your development environment, so don’t skip it!
Turn on Autosave
Manage⚙️ icon on the bottom-left side of the editor, and selectSettings. Alternatively, use(Ctrl + ,).Files: Auto Saveoption and selectafterDelay. This will autosave the code whenever you pause editing.Set Tab Size
Editor: Tab Sizeoption and input2. This is the industry standard tab size for JavaScript.Configure default formatter
format.Editor: Default Editoroption and selectPrettier Eslint.Default Formatteroption, locateEditor: Format On Saveoption. Make sure the box is selected, as this will automatically reformat your code and ensure you have the right style on each save.Node / Node Package Manager (NPM)
What is Node?
Node is a JavaScript runtime built in Chrome’s V8 engine. In other words, Node is JavaScript outside of the browser. Traditionally, JavaScript can only be executed within the browser, which is the client-facing side of web applications that every user has access to. However, Node allows you to run JavaScript code on the backend of your application as opposed to on the browser itself.
This allows you to use JavaScript for both the front and backend components of your web applications, making development much simpler and more straightforward!
All Node applications should contain a
package.jsonfile which specifies:macOS Installation
brew install nodeNote: If you have a Mac with an M1 processor,
homebrewdoes not have a stable release. You can download the latest version of Node / NPM here.Windows Installation
Download the Windows Installer directly from the official Node web site.
If given the option, install Node ^v16, this is because we want to stay up to date with the latest technologies. You may need to restart your shell after installation before the node command is recognized.
If you’re having trouble or are working on another system, you can find alternative ways of installing Node on your system by following the guide here.
To verify that you have installed Node correctly, run the following line of code in your terminal:
node --versionIf there is no error, you have installed Node correctly!
Recommended tool if you need to run multiple versions of Node / NPM
We are requiring the latest version of Node / NPM for this course (v16^) but we understand if you need to run multiple version if you have projects that you are working on that does not support the latest version of Node.
Luckily there is a tool that allows us to easily switch between versions of Node / NPM. It is called NVM (Node Version Manager). There is a Linux/MacOS version available here, and a Windows version available here.
The
readmein them is straightforward, and should allow you to easily switch between Node versions. Let us know if you have any questions getting this setup!Here are the basic terminal commands once you have it installed:
nvm list: Get a list of the versions currently installednvm install node: Install the latest available version (should be 16.9.0)nvm use node: Use the latest version of nodeYou will need to reinstall global packages for each version of Node / NPM that you have (eg. Yarn)!
If you are having trouble installing Node, please come to TA hours or seek help in the #nodejs Slack channel.
Yarn
Yarn stands for
Yet Another Resource Negotiatorand it is a package manager just like npm. It was developed by Facebook and is now open-source. The intention behind developing yarn (at that time) was to fix performance and security concerns with npm. If you are interested, here is an article that outlines the difference between npm and yarn.Yarn is a JavaScript package manager that aims to be speedy, deterministic, and secure. The Yarn Command Line Interface (CLI) will parse the
package.jsonfile in a Node application and will automatically reach out to the correct online registry and install that package onto your local machine. Its main advantage is its avoidance of any problems related to different versions of Node.js system modules on which the project will be mounted. Yarn should reduce the number of package-management-related issues you will have to deal with throughout the semester.So why need a package manager in the first place? Web applications usually use a great number of third-party packages and libraries so we don’t have to write everything on our own. Instead of manually installing the packages one-by-one, we use the package manager to automate this process. It’s really quick!
In order to get consistent installs across machines, Yarn needs more information on the dependencies you configure in your
package.json. Specifically, Yarn needs to store exactly which versions of each dependency were installed. To do this, Yarn uses ayarn.lockfile in the root of your project. Youryarn.lockfile is auto-generated and should be handled entirely by Yarn. As you add/upgrade/remove dependencies with the Yarn CLI, it will automatically update youryarn.lockfile. Do not edit this file directly as it is quite easy to break something!Installation
Install: To install yarn, run the following
npmcommand. It should not matter which directory you are in:npm install --global yarnVerify: To verify, the following terminal command should not return an error.
yarn --versionIf you are having trouble installing Yarn, please come to TA hours or, since Yarn is a node package manager, seek help in the #nodejs Slack channel.
Important! Yarn commands we use
To install all dependencies in one-click:
yarn installTo add an additional dependency:
yarn add <dependencyName>To remove an existing dependency:
yarn remove <dependencyName>The custom commands are all defined in
package.json.To start the service:
yarn startTo identify linting issues in code and autoformat the entire codebase, run:
yarn lintTo see your test coverage, run:
yarn coverageTo format the code base without lint check:
yarn formatGit Command Line Interface (CLI)
Simply put, Git is a version control system that lets you manage and keep track of your source code history. GitHub is a cloud-based hosting service that lets you manage Git repositories. If you are brand new to GitHub, consider watching this video.
Note: CS32 also has a very useful tutorial on how to use Git, which you can find here. If you do not know how to use Git, we strongly recommend that your use it.
Installation
[Optional] Desktop App
Alternatively, you can use the Github Desktop app, which is free to download here. This allows you to work with Github without having to manually run Github commands in your terminal. Some people have a preference for this, so feel free to check it out!
Fork is a more advanced alternative that you could also consider.
If you are having trouble installing the Git CLI, please come to TA hours or seek help in the #git Slack channel.
Checking Your Environment Setup
Now that you have everything installed, we need to check that everything is working properly! To do so, we have created an assignment on GitHub to test both a React frontend environment and a Node/Express backend environment. Accept the assignment here. If you can successfully run both of the applications after cloning their repositories and installing the related packages, then you’re good to go!
To-Do: Clone the
assignment0-setuprepository onto your computer. We recommend that you create acs1951vfolder so that this assignment, as well as others are organised into one folder - note this is not a technical requirement but just an organizational recommendation.Now that you have made a copy of the
assignment0-setuprepository on your local machine, you can open it with VS Code. Once you have opened it, make sure your active repository is the assignment’s root directory - in this case:assignment0-setup-[<yourGitHubUsername>].For this assignment and throughout the course we will be differentiating between the frontend and backend in the same way: All of the backend code will be stored in a folder called
serverand all of the frontend code will be installed in a folder calledclient. Our recommendation is to have one terminal open for each whenever you are working on the assignments!Disclaimer: The following repository uses technologies from the MERN stack mentioned above, specifically React for the frontend and Node/Express for the backend. We understand that we haven’t introduced these topics yet. Please do not worry about understanding the entire codebase of these starter applications at this moment as this is just for Setup. We will be providing in-depth resources on these topics before you start using these technologies yourself.
Backend
Now that your frontend environment is correctly set up, let’s verify that your backend environment is correctly set up as well. It contains another simple App file that uses an Express router to send a request to a local address. As before, you will be cloning this project and running it on your own computer in order to verify that your backend environment is set up correctly.
Open a new terminal window.
cdinto theserverfolder, which is where we handle the backend environment in our projects.Note: Some projects may seperate backend and frontend into seperate repositories.
We want to install the necessary backend applications packages and build the application with the following Yarn commands:
yarn installyarn startYou should see some error messages like this - scary, right?
andy@DESKTOP-JDJ38IV MINGW64 /d/code/setup/server (main) $ yarn start yarn run v1.22.5 $ nodemon src/app.ts [nodemon] 2.0.12 [nodemon] to restart at any time, enter `rs` [nodemon] watching path(s): *.* [nodemon] watching extensions: ts,json [nodemon] starting `ts-node src/app.ts` Server started on port undefined MongoServerError: bad auth : Authentication failed. at MessageStream.messageHandler (D:\code\setup\server\node_modules\mongodb\src\cmap\connection.ts:740:20) at MessageStream.emit (events.js:400:28) at MessageStream.emit (domain.js:470:12) at processIncomingData (D:\code\setup\server\node_modules\mongodb\src\cmap\message_stream.ts:167:12) at MessageStream._write (D:\code\setup\server\node_modules\mongodb\src\cmap\message_stream.ts:64:5) at writeOrBuffer (internal/streams/writable.js:358:12) at MessageStream.Writable.write (internal/streams/writable.js:303:10) at TLSSocket.ondata (internal/streams/readable.js:726:22) at TLSSocket.emit (events.js:400:28) at TLSSocket.emit (domain.js:470:12) { ok: 0, code: 8000, codeName: 'AtlasError' }This happens because we haven’t set up the environment variables yet. What is an environment variable?
Sometimes we have sensitive information that we need to include in our code - your password, your SSH key, or even the port number that your app is running on - that’s the reason why we keep those information in a seperate
.envfile and call them environment variables.Kill the current process by pressing
Ctrl+Cinto the terminal window.Use the following command to create the
.envfile:touch .envNew-Item .env -type fileThe following snippet contains the environment variables we will use this semester. Open the
.envfile we just created and then copy and paste this snippet:Now, let’s try it again - run
yarn startnow and that should start a server running on localhost:8080. Type the URLlocalhost:8080into your web browser, and if you see the messageYour backend setup is complete!, then your backend environment is set up correctly! Since we are going to use our backend service later, don’t kill the process yet!Frontend
To test your frontend environment setup, we will test that your setup works with a very basic React application. It contains a simple
App.tsxfile that displays some HTML using React. You will be running this app on your machine in order to verify that your development environment is set up correctly.Do not kill the backend process just yet. Open a new terminal and
cdinto theclientfolder, which is where the frontend code lives:cd clientNow that you are in the correct folder, you can install the necessary packages for the project with the following Yarn command:
yarn installPlease make sure your backend is running at the same time! Otherwise your frontend will not respond to any request you are about to make.
Create an
.envfile in theclientfolder withtouch .env. Paste the following variables into the file.Linting
To test whether your linter is working, please navigate to
client > src > App.tsx. You should now see a file that is intentionally formatted incorrectly. PressCtrl+Sto save the file. You should now see the file going through some stylistic changes, and the code format should look much cleaner.If you do not see any changes after you save, that means some steps in your linting set up is not completed. Please try it again, or enter
yarn lintto manually perform the reformat.If you cannot get the linter to run, please come to TA hours or seek help in the #assignments Slack channel.
Now that we are in the correct folder and have the necessary packages installed, we can run the frontend code! The web application can be launched using the Yarn command:
yarn startNote: For people who have used npm before, this is the same as
npm start.Running this command should automatically open up
localhost:3000in your web browser. If it doesn’t, you can manually open it by going to the URLlocalhost:3000in your web browser.Note: To stop running the React web application hit
Ctrl+Cin the terminal that it is running from.If you see the following message, your frontend environment is correctly set up, and you should be set up for the rest of the course!
If you cannot get the application to run, please come to TA hours or seek help in the #react Slack channel.
Deploying your bio to the CS1951v Website!
Now, you can get some practice working with TypeScript objects! But more importantly, you can get to know your classmates. You will be making a basic API call to deploy your profile onto our course website!
First, go to
client > src > api > profile.tsand read theIProfileinterface. Then, you should properly fill out this placeholder text:with all your information!
If you need a way to upload your profile or donut image, you can use https://imgur.com/upload, and then right click the image > “Open image in new tab” to get the direct link URL ending in
.png,.jpg, etc. Make sure your url ends with.png,.jpg,.jpeg, or.gif, otherwise it will not pass our regex check!Throughout this course, we will be following the convention of prefixing our interface names with
I. This helps to distinguish an interface from an instance of that interface (e.g. the interfaceIProfilev.s. the instanceprofile). This is not the only way to distinguish interfaces, but it is very clear!Now, you can see Typescript in action! To tell the typechecker that
profileshould be an instance ofIProfile, you can add a type annotation like so:Now, if you are missing a field or one of the fields is an incorrect type, you will get a type error! This is an example of how Typescript prevents bugs and makes your Javascript codebase significantly easier to maintain.
If you edited your profile you will now see a profile and a button at the same
localhost:3000site that you had set in your frontend environment setup! If you have saved theprofile.tsfile, then it should look something like this:If that works, and if you are happy with your profile, you are ready to deploy your bio to the course website! Click the “Deploy your bio to the website” button, and check the course website to see you and your classmates :)
Our website is hosted at http://cs.brown.edu/courses/csci1951-v/. Go check it out!
If you get an error, check that your
profileobject has valid data for all the required fields. If you’re stuck for more than a few minutes, message in the #assignments channel!Congrats!
You’re now set up for the rest of the programming assignments 😎 Happy coding!
Happy coding but don’t forget the reading 📚 assignments!