Clocks, Timers, and Watchdogs
Table of contents
About
In this lab, you will familiarize yourself with the clocks on your chip, learn to use an automatic timer/counter to create a square waveform of a custom frequency, and get practice setting up a watchdog timer. You will also learn how to use a Piezo speaker and go through the process of running a suite of tests before writing up your circuit.
Lab 4 Rubric
Resources
- Arduino API
- Arduino Help
- SAM D21E/SAM D21G/SAM D21J Datasheet Summary
- Atmel SAM D21 Family Datasheet DATA/STORAGE WARNING: 1115 page PDF
- SAM D21 peripheral header files
Materials
Included in your kits:
- Arduino MKR1000 and USB cable
- Breadboard
- 1 piezo speaker
- 1 resistors (1kΩ)
- Jumpers/wires
Provided:
- None necessary
Prelab (due date: October 5, 2021 at 4pm)
Duplicate the following worksheet and fill it out digitally, or print it, fill it out on paper, and scan it to turn it in. The idea is to be able to refer to this worksheet during the lab.
Procedure
A note on the lab: please try to be mindful of the noise you are creating when testing your code. If at all possible, use the test functions provided and Serial output when debugging. If you must play the speaker constantly for debugging, we suggest using a 10k instead of 1k resistor to make the speaker slightly quieter.
-
Download and extract the starter code. Open
song_player.inoin your IDE. Also enable line numbers in your IDE if you haven’t already, underFile > Preferences. -
As alluded to in the pre-lab, your job in this lab will be to use a Timer/Counter to toggle a pin at a certain frequency, to play certain notes on your piezo speaker. Scroll through the starter code and discuss it with your partner. We will implement and test the TC functionality first, so we do not have to configure the Piezo pin or WDT, nor pay attention to the song parser, yet.
Read the
test_notefunction and make sure you understand how it works. In particular, note that in order for the test to work, you must include theintcount += 1;line in the
TC3_Handler()interrupt ISR. -
The lines you will have to change in the code have been annotated with comments. For example, the line you will change for this step has a comment with
LAB STEP 3above it. Set theCLOCKFREQconstant on that line to the pre-scaled frequency you determined in step 11 of the prelab. -
In the code, configure the GCLK according to the register bits you determined in step 8 of the prelab. Remember that you need to wait for the SYNCBUSY bit of the STATUS register to clear after writing to GENDIV and GENCTRL. GENDIV has been done for you.
-
Have your code check the relevant PM bit(s) from prelab step 9 by printing them to Serial.
-
Enable the TC according to the bits you determined in Step 10. Disable the TC3 interrupts. Make sure this code is done before the lines that set up the NVIC (the code under the comment with
LAB STEP 6makes sure of this for you). Comments in the code tell you how to reference the TC registers.Similar to lab 3, you can hard-code the values of the bits shifted to the relevant locations, or use the macros defined in
tc.h(SAM D21 peripheral header files)Remember that you need to wait for the SYNCBUSY bit to clear after writing to some of the registers, described in 30.6.6.
-
Fill out the
play_note,stop_play, andplay_note_durationfunctions, referencing step 11 of the prelab for the register configurations. Remember to enable and disable interrupts as needed, using the bits you determined in step 10 of the prelab.-
Remember to clear the interrupt register flag in the
TC3_Handler() -
There shouldn’t be anything in the
loop()function yet. Open the Serial Monitor in your IDE and upload and run your code on the Arduino (without any circuits). This will run thetest_all_notes()function in thesetup(). If you get the result that “All tests passed!”, get this checked off with a TA. Otherwise, debug your code. Have your prelab available, which will help the TAs help you.
-
-
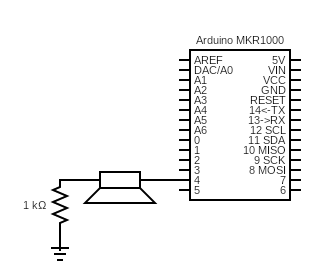
Now make the code play a song on the piezo! Wire up the following circuit:
-
Using the MKR1000 schematic, determine the port pin number that corresponds to pin 4 on the arduino, and set the
PB_PINvariable accordingly. Referencing the registers (aka without usingdigitalWrite(...)pinMode(...)), configure this pin as an output and make theTC3_Handler()toggle it every time it is called. Also remember to makestop_play()turn the pin off. -
Remove the line with
test_all_notes()from thesetup()function and uncomment the song parsing (under theLAB STEP 8acomment). -
Modify the
loop()function to play the song, note by note, and then pause for two seconds before playing it again. -
Upload, run, and debug your code. When you think it works, get it checked off by a TA.
-
-
Now you will configure a watchdog timer to reset the board if the watchdog timer hasn’t been petted for 4 seconds, and to warn you after two seconds.
-
Pet the watchdog once every iteration of the
loop()function, according to your answer in prelab step 12. -
Uncomment the four lines starting with
NVIC_under theLAB STEP 9comemnt. -
Configure and enable the WDT GCLK according to your answer in prelab step 13. Remember about the SYNCBUSY bit! GENDIV has been done for you (uncomment it out).
-
Configure and enable the WDT and early warning interrupt according to your answer in prelab step 14. Remember to enable the early warning interrupt, and remember to wait for the SYNCBUSY bit for any registers described in 18.6.5.
-
Complete
WDT_Handler()according to the documentation in the code. -
Run your code and observe the Serial monitor. What happened? Did the song play to completion? If your song did not play to completion, modify your loop() function code such that it calls
play_note_duration(...)only once per execution of theloop()function (hint: you may need to define a new global variable.) Does it play to completion now? If so, increase the delay between replays of the song, and see if you can trigger the watchdog reset. Get this checked off by a TA.
-
Writeup
In a document, answer the following questions. Make sure the report states your name (first and last) and your partner’s name (first and last)! (if you worked alone, write “no partner”)
-
Think through the following list of concepts you encountered in the lab, and note if you have questions about any of them. Please also include any questions about concepts not listed here. If you have no questions, just write “no questions”
clocks/oscillators, timers/counters, watchdog timer, frequencies, blocking/non-blocking functions, piezo speakers -
What, if any, frustrations did you encounter while doing the lab?
-
What was your main takeaway from this lab?
-
Using knowledge of timers/counters, how would you time (give or take a few clock cycles) how long a block of code takes to execute? You do not have to give code or pseudocode for this answer, just explain how you would use any timer/counter peripherals at the beginning/end of the block of code in question.
-
Including the pre-lab and writing this document, how long did this lab take you? You will not be judged on your answer for this question, the numbers are just being used for calibration purposes for later labs and future course offerings.
Turn in the code (just your modified song_player.ino file) and the document (saved as a PDF; separate from the zip of the code) on Canvas.