CSCI1290 : Final project
OpenCV with Android/Java
sbnguyen
Goals
The main goal of this project is to explore the idea of using Android for future CS129. I want to do this for various reasons:
- The N900 was kinda a disaster, most people don't have it working properly. Nokia is abandoning Symbian, Qt and most likely Maemo so I don't think this framework is going to get updated much longer. People cannot really use the apps that they create on their phone because noone has the N900
- Android is a growing platform. More and more people are using it and Android phones are getting better, some are more powerful than the N900.
- The toolchain of Android is much better than for Maemo. Doesn't require root so department computer can actually be used for development, reducing the headache of maintaining VM and tell people to update it.
- Android does support native code and thus projects can be done in C++ if needed.
- Get a project using OpenCV running on Android phone and Java. Example is always much better than documentation or instruction.
- Create a log/tutorial so people can actually replicate what I did from scratch
- Evaluate different ways of getting things running on Android
- Most important: Create a framework/stencil code that is:
- Easy for students to work with. As effortless to setup as possible. Doing stuff on the phone is cool but it's slow and hard to test/debug. Most people will just work on a desktop version first before porting it to the phone. Make this process of switching between phone and desktop and easy as possible.
- Easy for the staffs to work with, creating new stencil codes and distribute to students. Easy to run students codes after they handed in.
- Approaches that I have tried and evaluation of them. Whether they should be tried again in the future if it's not working out right now.
- Log/tutorial: Step by step how to setup the environment and stencil code
- Results of the android program (if you still believe I didn't do anything for this project)
- FAQ: Random things that people might run into and can drive them nuts
- Rants ...
Approaches and evaluation
Android in general
Pros:
- Growing.
- Good support from Google
- Powerful device coming out
Cons:
- Right now no precise manual exposure control. Hopefully it's coming soon
- No good way to take burst of pictures (afaik). You have to take picture, get it, call startPreview again and take another one. The lag is typically 1 sec between 2 pictures. Though using preview buffer might be enough because the phone cannot process big image anyway.
Android OpenCV
Website: http://opencv.willowgarage.com/wiki/AndroidThis is the official Android support of OpenCV. Things are build using Android NDK, JNI and Swig.
Pros:
- Official suuport from OpenCV. Things can be hoped to improve.
Cons:
- JNI is a pain to work with
- Using SWIG to generate config file. Overhead of learning new things and headach when it breaks.
- Only 1 or 2 actual samples program and no instruction to create your own new projects.
After spending a few hours trying to get my SWIG config file to work, I scrapped the whole things. If it's that hard just to get a sample program working then it's not going to be much better than the N900. You have to define your method 3 times: in Java, in C++ and in SWIG. That's not fun.
JavaCV
Website: http://code.google.com/p/javacv/This is the Java interface for OpenCV and is built on top of JavaCPP (which is created by the same guy). It works with Android and has instruction for it
Pros:
- Almost all functionality that people need for OpenCV
- Users only have to code in Java. No dealing with config file or anything.
- JavaCPP pros
Cons:
- Doesn't offer all functionality of OpenCV. On the mercy of the author to implement new stuffs. For example FLANN is currently not supported.
- Right now only support C interface of OpenCV. Functionality that doesn't have C interface is not available.
- Currently have problem with loading calib3d and feature2d on the Android phone so auto image alignment doesn't work on Android. It works perfectly on the Desktop version.
- Almost no documentation. Granted it's just a wrapper for OpenCV functions so you can check WillowGarage documentations.
- Some JavaCPP cons
Right now this is the most promissing approach and is the only approach that I got a working Android program. It took me about 2 full days from downloading JavaCV to get a Desktop version of Exposure Fusion working by porting C++ code from Project 5 to Java.
JavaCPP
Website: http://code.google.com/p/javacpp/The base for JavaCV and from the same guy. JavaCPP is the interface for using C++ codes in Java. It's still JNI deep down but you don't really have to write a separate JNI class or SWIG files. What you have to do is decorate your Java file and declaration of native method and JavaCPP will generate the code for you.
Pros:
- Reused of old C++ code
- Native spped because this is JNI
- Can actually use all functionality of OpenCV
Cons:
- Have to work on 2 languages, Java and C++ at the same time
- An extra build step to generate the approriate .so file. I have instructions to really simplify this process though.
- Almost no documentation.
- Some concept like the Pointer class is a pretty weird concept and hard to wrap your head around
I got the exposure fusion desktop version to work with only the addition of about 20 lines of C++ code. Getting this additional build step to work with Android doesn't seem to be too bad but I don't have to do that. I think a better documentation is better than handing in something that works but cannot be modified or replicated.
Android NDK Native activity
Android NDK now support native Activity which means you can write your apps entirely in C++. I haven't had the chance to try it but it seems feasible. No documentation from OpenCV Android though.
Pros:
- Entirely C++. Seems like people like it better than Java ...
- Can actually use all functionality of OpenCV
Cons:
- Doesn't sound much better than compiling code for the N900
- Hard to incoporate this with the Eclipse plugins.
- Did I mention C++? Yeah, I don't like it that much.
Tutorial
I will go through step by step how to setup a project that have both Android and Desktop version in Eclipse. To do this the easiest way is to create 2 separate projects: a Java one and an Android one because you cannot realy have 2 build procedure for a project and some platform specific code. Symlink will be utilized to share common code. My example is in code/javacv/ExposureFusion and code/javacpp/ExposureFusion
JavaCV
- Install Android SDK
- Install OpenCV
- Go to JavaCV website and download the bin and Android compiled binary
- Create an Android project, preferably with cs129 namespace (cs129.fusion for the project for example)
- Setup library as instruction of JavaCV
website. Specifically:
- Create libs folder
- Copy javacpp.jar and javacv.jar over
- Extract javacv-android-arm.jar into libs/armeabi
- Extract the downloaded compiled binary for Android into libs/armeabi also. The jar file will extract into recursive folder (something like com/googlecode/javacv), go into that and copy all the so files out to libs/armeabi
- Note here: if your phone is new enough, use armeabi-v7a. It has FPU instructions which makes things faster. You can extract the jar file into armeabi-v7a without anyproblem because it's just jni wrapper. Use the correct version for the binary lib though
- Add javacv.jar and javacpp.jar to the Java build path. Do this by: Right click on project -> Properties -> Config build path -> Libraries -> Add JARS
- Add permission to AndroidManifest.xml so you can use the
Camera and write to SD card:
<uses-permission android:name="android.permission.CAMERA" /> <uses-permission android:name="android.permission.FLASHLIGHT" /> <uses-permission android:name="android.permission.WRITE_EXTERNAL_STORAGE"/> <uses-feature android:name="android.hardware.camera" /> <uses-feature android:name="android.hardware.camera.autofocus" /> <uses-feature android:name="android.hardware.camera.flash" /> - Create your package (folder) to store code that you are going to use for both the Android and Desktop version. Something like cs129.fusion.common
- Now create your Java project with the same namespace (cs129.fusion)
- Add library: javacpp.jar, javacv.jar, javacv-linux-x86.jar (or something appropriate with your system)
- Create a symlink for that common folder. For example:
cd PCExposure/src/cs129/fusion ln -s ../../../../AndroidExposure/src/cs129/fusion/common . #Don't forget the dot - Use relative path instead of absolute path so that people can copy it around and hand it in.
Your project now should look like this:


Note a few things:
- The 2 cs129.fusion.common are the same thing. 1 is symlink of the other
- Pay attention to the 2 Logger.java files. They are not the same. Look at them in the handed in projects. Your common code will use something like Logger.log("abcxyz") but depend on which project you are running (Android vs PC), different Logger.java file will be used. The desktop version will use System.out.println while the Android one will use Log.d . This will makes sure that you have your log no matter what (Suteki da ne?)
- The Util.java class in Android contain the code to convert from Android Bitmap to IplImage and back, use it.
JavaCPP
- Create Java project
- Add JAR library
- Add additional builder:
- Copy the ant build file build.xml from my project to the new project
- Right click project -> Properties
- Builders -> New -> Ant Builder
- Set Buildfile = ${build_project}/build.xml
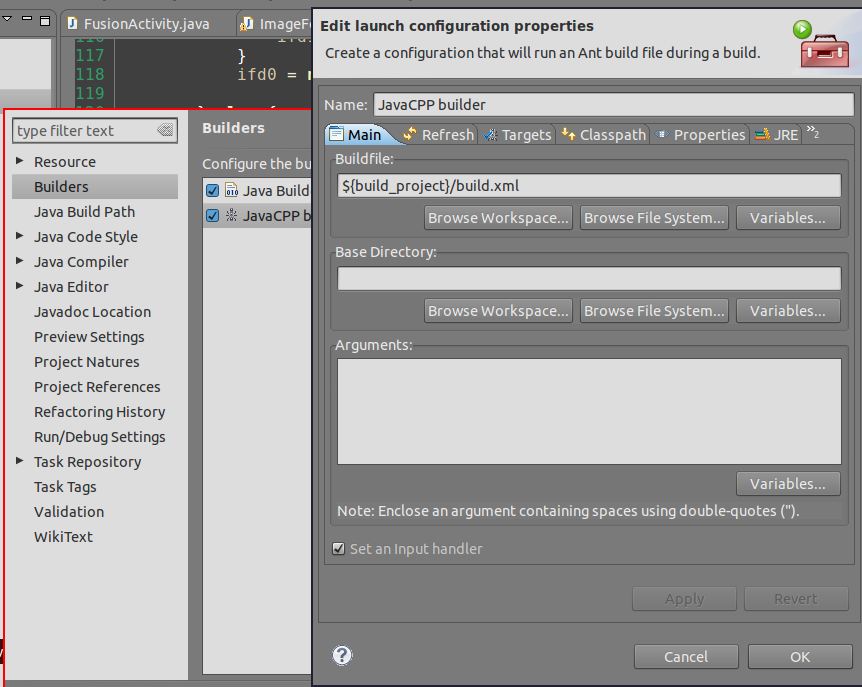
- Done
- The ant build file will call javacpp.jar if needed everytime you try to build your project to generate JNI file. Modify it to suit your config. You are welcome.
Android result
Nothing really impressive here. I tried both different exposure time and flash/noflash
 |
 |
 |
 |
 |
 |
 |
 |
 |
 |
 |
 |
 |
 |
 |
FAQ/Tips
Here are some stuffs that I think would be helpful if you want to do any of these
- Download source code for Javacv, Javacpp and Android and attach it to your library. It can be helpful reading through source code to figure out what's going on
- Pointer.position() is equivalent to pointer manipulation in C++. Pointer is a wrapper around memory address and p.position(x) is x bytes after p
- I would add more if I'm not brain dead right now ...
Rants
- If you are Travis I think you know what I went through for this project
- If you are not Travis and you think I am a slacker and did nothing for the final project, please talk to Travis :(
- Thank you for the class. I really enjoyed it except for the phone