Names, types, and organization
The definitions window, revisited
Let’s start by trying to write a program to produce a pair of googly eyes. We’re working with images, so we’ll need to start by telling Pyret we need images:
include image
Now let’s try and build one of the eyes–say, the left one. We’re going to
need one circle over another circle, so maybe we’ll try overlay:
> overlay(circle(20, "solid", "blue"), circle(20, "solid", "tan"))
We don’t want the iris centered on the eyeball, so we’ll need something
else. We can take a look at the image documentation to try and find what we
want. We’re looking for something like overlay, but different, so let’s
search for “overlay” on that page. A-ha–let’s try overlay-xy. It looks
like we can position one image over another! Let’s try something like this:
> overlay-xy(circle(20, "solid", "blue"), 10, 20, circle(20, "solid", "tan"))
overlay-xy has moved the “back” image right by 10 pixels and down by
20 pixels. That’s not quite what we want. We need to move the back image to
the left and up, so we’ll use negative numbers. I happen to know that the
right values are -25 and -25:
> overlay-xy(circle(20, "solid", "blue"), -25, -25, circle(20, "solid", "tan"))
We can call this value left-eye:
left-eye = overlay-xy(circle(20, "solid", "blue"), -25, -25, circle(20, "solid", "tan"))
We’re putting this in the Definitions window, since we want to save it.
Now, how can we make the googly eyes?
left-eye = overlay-xy(circle(20, "solid", "blue"), -25, -25, circle(20, "solid", "tan"))
beside(left-eye, flip-horizontal(left-eye))
Reading documentation
Let’s take a look at the documentation for Pyret’s image
library. Specifically, let’s check out the documentation for a function we
touched on briefly last week but didn’t talk about in detail:
overlay-xy. 1
The Pyret documentation gives the following signature for overlay-xy:
overlay-xy :: (
  img1 :: Image,
  dx :: Number,
  dy :: Number,
  img2 :: Image
)
-> Image
Image and Number are types, which represent categories of values. We’ve
seen examples of both types--circle(50, "solid", "red") is an Image, and
1/3 is a number. String is also a type--"dog" is a String. We’ll see
more types as the course continues.
The signature for overlay-xy uses these types to describe its inputs and its
outputs. When we call overlay-xy, we’ll need to call it with an Image, two
Number’s, and another Image–in that order. If we don’t, Pyret will raise an
error. These expressions are both errors:
> overlay-xy(circle(50, "solid", "red"), 10, 10)
> overlay-xy(circle(50, "solid", "red"), 10, 10, "dog")
The signature provides descriptive names for its inputs to help you remember
what each of them does. For instance, dx is the number of pixels to shift the
background image on the x axis.
The signature also specifies a type (in this case, Image for the operation’s
output). This determines the contexts in which you can use the operation. You
can tell from the signature that
> rotate(45, overlay-xy(circle(50, "solid", "red"),
                        10, 10,
                        circle(100, "solid", "blue")))
is a valid operation, while
3 + overlay-xy(circle(50, "solid", "red"),
               10, 10,
               circle(100, "solid", "blue"))
is not.
Code organization exercise
Take a look at this alien face emoji. Now, imagine you’re writing a program to create it. What names do you think you might define? What are some components of the structure of this image? Take a minute and write down a list of names.
Now, Here are two versions of a program to draw an alien face emoji.
Version 1:
include image

base = circle(100, "solid", "green")
eye = circle(18, "solid", "red")
# create pair of eyes, using another square as a spacer
eye-spacer = square(24, "solid", "green")
eyes = beside(eye, beside(eye-spacer, eye))
mouth = ellipse(60, 30, "solid", "blue")
# create a 3-pixel border for the base
border = circle(105, "solid", "black")
eye-face-spacer = rectangle(60, 30, "solid", "green")
eyes-and-mouth = above(eyes, above(eye-face-spacer, mouth))
the-face = overlay-align("middle", "middle", eyes-and-mouth, base)
add-border = overlay-align("middle", "middle", the-face, border)
emoji = scale(0.4, add-border)
emoji
Version 2:
include image

base = circle(100, "solid", "green")
eye = circle(18, "solid", "red")

# create pair of eyes, using another square as a spacer
eyes =
  beside(eye,
    beside(square(24, "solid", "green"),
      eye))

mouth = ellipse(60, 30, "solid", "blue")

# create a 3-pixel border for the base
# use the image-width to compute the border size
border = circle((image-width(base) / 2) + 5, "solid", "black")

# keep the large image so we can look at it if needed
emoji-large =
  overlay-align("middle", "middle",
    overlay-align("middle", "middle",
      above(eyes,
        above(rectangle(60, 30, "solid", "green"),
          mouth)),
      base),
    border)

# scale the large image down to the size we want
emoji = scale(0.4, emoji-large)

# automatically show the image when we run the file
emoji
Which version do you like better, and why (class discussion)?
How about this version:
scale(0.4,
  overlay-align("middle", "middle",
    overlay-align("middle", "middle",
      above(
        beside(
          circle(18, "solid", "red"),
          beside(
            square(24, "solid", "green"),
            circle(18, "solid", "red"))),
        above(
          rectangle(60, 30, "solid", "green"),
          ellipse(60, 30, "solid", "blue"))),
      circle(100, "solid", "green")),
    circle(105, "solid", "black")))
In this course, we’ll generally encourage you to write code like Version 2. But finding the right balance between naming subcomputations and clean code structure is often challenging, and each person will do it differently! Please don’t write code like Version 3, though. Remember–programs are read by the computer, but they are also read by other people!
How overlay-xy works
Understanding the dx and dy inputs in overlay-xy can be difficult. The
important things to remember are:
dxanddyaffect the position of the back image (theimg2input)- Higher
dxvalues move the image to the right. Higherdyvalues move the image down.
This diagram may help to understand what’s going on:
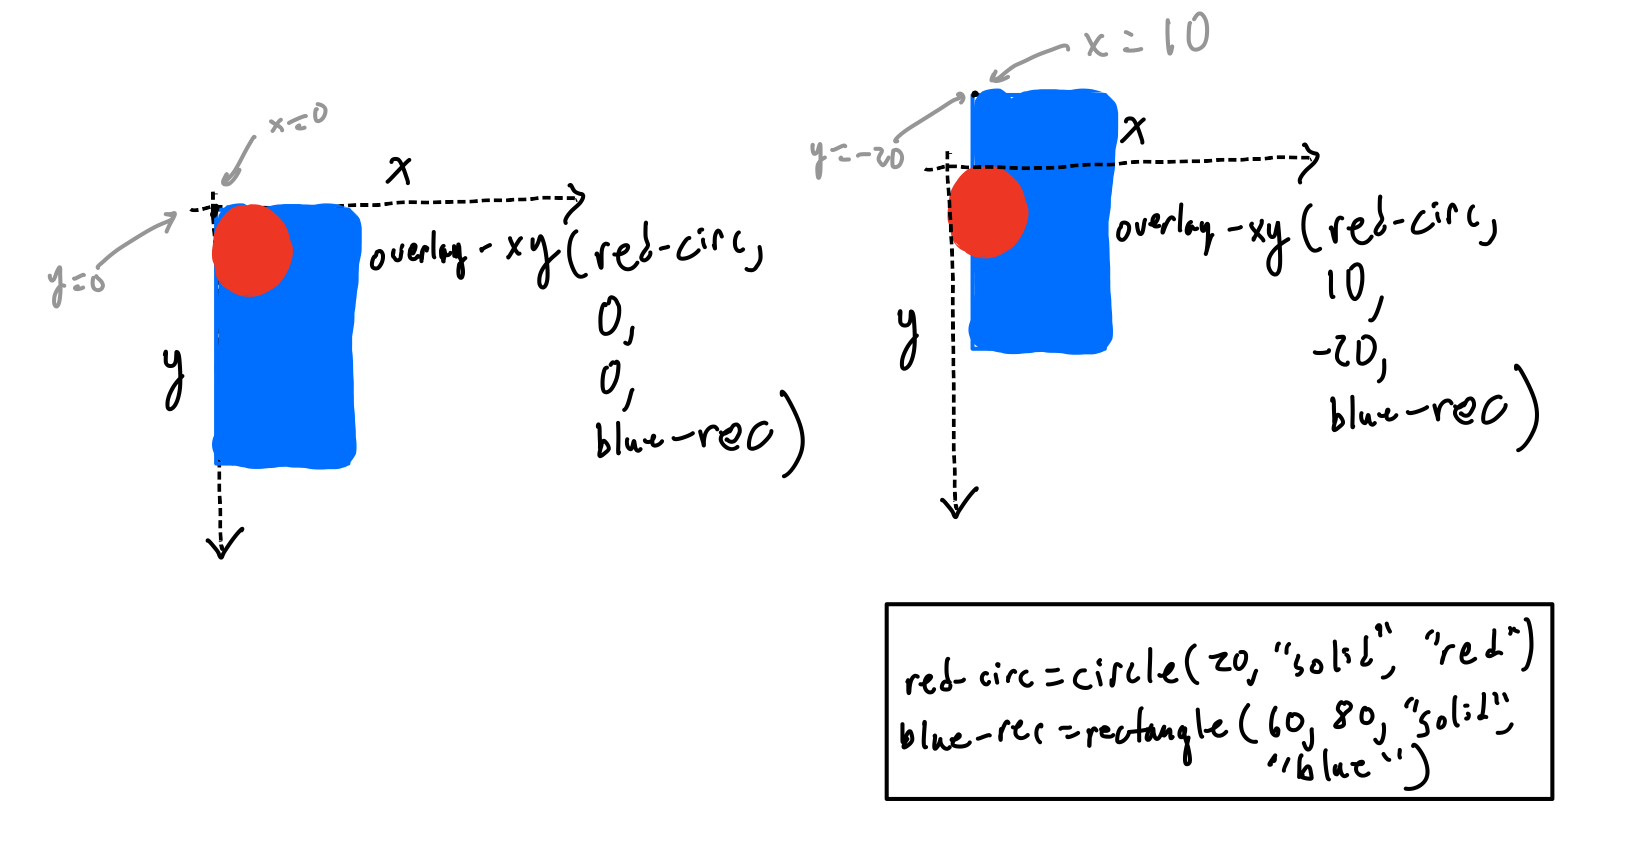
Notice that in both images, the red circle remains with its top left
corner at (0, 0) in the coordinate system. The blue rectangle moves behind
it–moving up because the dy input is negative, and to the right because
the dx input is positive.
Footnotes:
You don’t need to use overlay-xy on the homework, though
you can if you’d like.