DrScheme: An IntroductionCS9 section 2 |
Getting DrScheme
The first step is to get a copy of DrScheme running on your local machine.
(If for some reason you already have DrScheme, please be sure to get the
latest version -- v.208.) To do this, go to
PLT-Scheme.org,
select your platform (most likely "Windows (95 and up) x86" or "Mac OSX"
-- not one of the source code options), select version 205, and click
"download." Select a download site, and save the file to your computer.
Now run the installer you just downloaded and follow the instructions.
Windows users: You may be given the option of installing with .zo files. You
will be happier if you spare the extra couple of minutes and DO install
them, but be forewarned that the installer may appear to hang at 100%. Be
patient, and wait until it says the installation is actually complete.
Macintosh users: No special instructions.
Linux 2.0 users: Try the Linux RPM file. If that doesn't work, follow the instructions for the Unix/X source code.
Other Linux/Unix users: If your flavor of Unix has an RPM system, use the Linux RPM file. Otherwise, or if that doesn't work, follow the instructions for the Unix/X source code.
Running DrScheme
For now, select "Beginning Student" under "Teaching Languages," and press "Finish." A window will come up that looks something like this:

Language Options
In the future, you will need to switch languages in order to run some of the code that we give you. To switch languages to "Textual," go to the "Language" menu, select "Choose Language," and look under "Professional Languages" at "PLT." If "Textual" is not listed directly below "PLT," click on the arrow next to "PLT" to display more options. You'll have to execute your code once for the language to change.You may be wondering what all this business with languages means. Basically, Scheme is a programming language. It's derived from a family of languages designed for list-processing, the primary example of which is LISP (thus some computer scientists may use the terms "Scheme" and "LISP" interchangeably). There are lots of different versions of Scheme, each with different features. DrScheme, as a programming environment, supports a number of different related languages, among them traditional Scheme, MrEd, and MzScheme. The language you should use depends on what features you need.
"Why not always use the language with the most features?" you may wonder. There are a number of reasons. First of all, more limited languages are sometimes able to offer useful tools to help you fix your code. Second of all, by limiting your language, you simplify the world you're working in, so you're less likely to accidentally misuse an advanced feature of the language.
The DrScheme Environment
Enough talk about languages for now. Let's get oriented in the DrScheme programming environment. The most obvious thing about the window is that there are two places where you can type. The top one is called the Definitions window, and the bottom one is called the Interactions window.
You will want to type most of your code in the Definitions window. When you execute your code, by pressing the execute button, the results will be displayed in the Interactions window. The Interactions window also lets you type one line of code at a time, but once this code is executed (by pressing "Enter" or "Return") you can no longer edit it.
For now, the most important buttons to keep in mind are "Execute" and "Break." Press "Execute" to run your code from the Definitions window. If your code is ever taking an exceptionally long time to run (perhaps it is looping infinitely) or you have another reason to halt its execution, press the "Break" button. You may have to press it a couple of times and be patient before it responds.
The Stepper
The button "Step" is available in the Beginning Student language, and the Stepper can be a useful tool to help you understand what your code is doing. Press the "Next" button in the Stepper to move ahead one level in the substitutions being carried out in the evaluation of your code. (Don't worry too much about this now -- you'll encounter the substitution model again later.)
Interacting with DrScheme
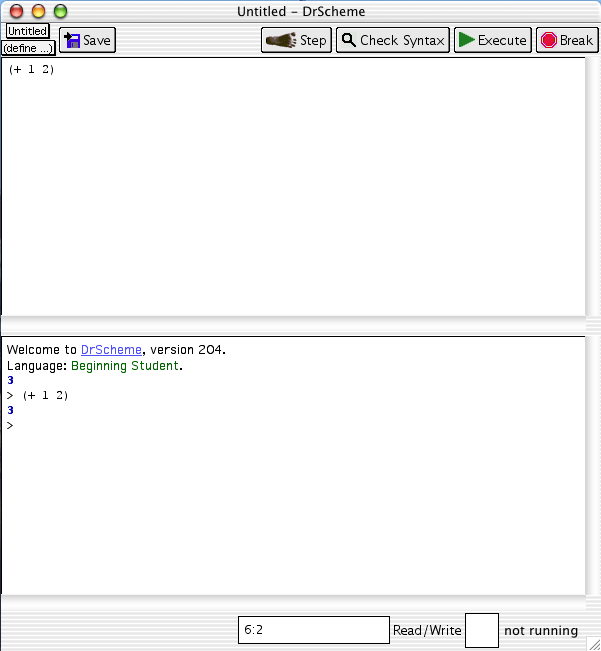
Now let's write some code. In the Definitions window, type (+ 1 2), and then press "Execute." The number 3 should appear in your Interactions window (after all, 1 + 2 = 3). Next try typing the same thing in the Interactions window, next to the prompt (">"), and then press "Enter" or "Return." Your window should now look something like this:

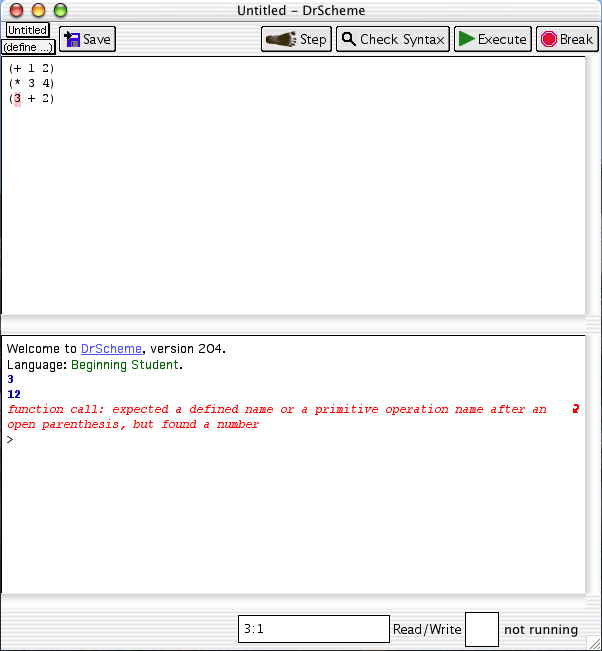
If you type a series of statements in the Definitions window and then press Execute, each one will be evaluated in turn. Add the following lines to your Definitions window and then press Execute:
(* 3 4)Your screen should now look something like the one below. The presence of red text means you've just written code that has a bug, or an error, and provides an explanation.

The first two statements evaluated without a problem (note that "*" represents multiplication), but Scheme wouldn't accept "(3 + 2)." Why not? The problem is with the order. Scheme expects procedures (such as +, -, *) to come first, and their arguments (the things they act on, such as 2, 3) to come afterwards. So the correct Scheme statement would be (+ 3 2).
And what about all these parentheses? While extra parentheses don't change the meaning of a statement in some programming languages, they do in Scheme. Every parenthesis has meaning in Scheme, and parentheses are the primary means of organizing statements. This comes from the fact mentioned earlier, that Scheme is derived from languages which work with lists. For now, just keep in mind that any statement evaluated in Scheme should be surrounded by parentheses.
The menus in DrScheme are fairly simple. File:Save Definitions allows you to save the lines of code in your Definitions window only. The Interactions window is not saved. If either your Definitions or Interactions window seems to have gone missing, check out the options in the Show menu.
By putting a semicolon (;) at the beginning of a line in the Definitions window, you prevent Scheme from evaluating it when you press Execute. In the figure below, this is used to include text in a program, as well as to prevent DrScheme from reaching the line which caused an error before.

Finally, in the Help menu, the Help Desk is an extensive resource on Scheme and DrScheme. It can be a bit overwhelming, but it's a great place to look around, particularly if you would like to learn more about an aspect of Scheme mentioned in the book.
Happy Schemeing!