The Distance Learning Environment (DLE) Client is a software utility developed at Brown under the guidance of Prof. Roberto Tamassia. It has been used successfully by students over the past year in CS15 and CS16. In the Sunlab, the Client provides a simple, common interface for installing assignments, running demos, and compiling and executing your own code. At home, it simplifies the process of porting the Java assignments of a class such as CS16 from the Sun platform to Windows. Tasks such as synchronizing local support code libraries with the master copies and assembling CLASSPATH's and other compiler options are handled by this utility.
Setup for the DLE in the Sunlab is a simple process, as most of the necessary software has already
been installed in world-readable locations on the CS dept. network. All that is required to set up the client
on a CS account is the following script: /course/cs016/bin/dle-init
This script will create a 'dle' directory in your home ('~') directory, which is where all code and other information specific to your account will be stored.
One of the advantages of Java is that it is designed to be cross-platform. This allows the client to be run not only in the lab but also at home, if the system is configured properly. Sun fully supports its JDK (Java Development Kit) for Windows, so this is the recommended platform for users who wish to run the client at home. (Unfortunately, the recent versions of the JDK have not been implemented for the Mac, so we cannot support the client on the Mac platform.)
Note: The DLE Work-at-Home environment will be supported, and course staff will try to address any technical issues that arise. However, the "Windows" platform encompasses many different possible system configurations, so it is not guaranteed that the process described in this document will run flawlessly on all systems. If you encounter an unexpected number of problems and the deadline is approaching, it is recommended that you move to the Sunlab to complete the assignment.
The DLE Client is a Java application, so you will need a recent version of Sun's Java JDK. The JDK is a set of applications and libraries which allow for the development and deployment of Java programs on a specific platform (in this case, Windows). The JDK can be downloaded for free from Sun's web site (see link below). It is required that you download version 1.3 as this is what the client was written with and has been tested under extensively.
Links:
Sun's JDK 1.3 Windows Download Page
Sun's main Java resource page
The file you download will be an executable installation utility. Simply
run this file and follow any on-screen instructions and prompts. Note:
installing the DLE will be easier if you accept the default JDK install
directory (usually c:\jdk1.3).
Once you have set up the JDK on your computer, you can download and install the DLE Student Client. The DLE installation utility is an Executable JAR File. A JAR ("Java ARchive") file is a compressed collection of Java programs/libraries and is used to conveniently bundle and transfer a large Java program. An Executable JAR File is one that can also be run as a program by double-clicking on it in Windows Explorer (this association should have been set up by the JDK installer).
The first step is to download the DLE Client JAR file. The link to this file is provided below. Important Note for Netscape Users: Do not download this file by simply clicking on it. Some versions of Netscape will try to display the file as text, and saving this will result in a corrupted version of the file. Instead, right-click on the link, select "Save Link As..," then save it to your system.
DLE Home Client Executable JAR File
To test that the JAR file was downloaded successfully, you should check that the size of the file you downloaded matches that of the file on the server (to get a file's size, right-click on the file and select "Properties"). It should be 9398 bytes. Under certain configurations, some browsers (Netscape in particular) have been known to incorrectly transfer the contents of a JAR file. If you downloaded using Netscape using the above method and there is a mismatch in sizes, try using a different utility, such as Internet Explorer.
Once you have the JAR file on your local system, you can execute it by double clicking on the file in Windows Explorer or on the Desktop (if you stored it there). After a few seconds, a window labeled "DLE Client Installer" should appear. If this does not happen, there are two likely explanations:
c:\jdk1.3\bin\java.exe -jar dle_install_v1_3.jar
c:\jdk1.3 with the appropriate directory).
Once you have the installer running, you will be prompted for the JDK install directory. If you installed JDK1.3 to the default directory, this should be automatically detected. Otherwise, you may have to provide the JDK install directory yourself.
You will also be prompted for the directory where you want the DLE
client to be installed. "C:\dle" is the default; you may specify a
different one if you'd like. Avoid choosing a directory with spaces
in the name, such as "C:\Program Files"; this may result in errors running the
client or your Java programs).
In the Sunlab: The dle-init script will
create an executable dle-run file in the ~/dle/ directory. Use this file to invoke the client.
On a Windows machine: The Windows installer will set up an
executable "batch" file, dle.bat, which you will use
to run the DLE Client. When you run this file an MS-DOS window will show
up. You may safely ignore this window for now (but do not close it while
the Client is running -- this will terminate the Java process, and
hence, the Client). MS-DOS windows are a common sight when you are
working with Java under Windows (they are the closest equivalent of UNIX
shells that Windows has).
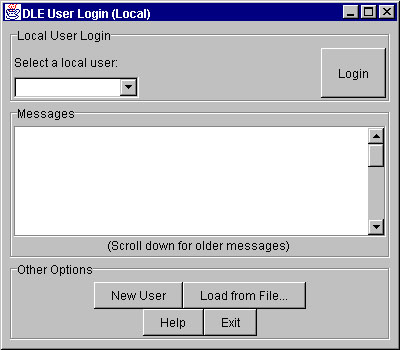
Once the client is running, the interface and functionality for the Sunlab and Windows versions are very similar. When you first run the client, you will see a "login" window:
The DLE client supports multiple local user "profiles" (similar to Netscape Communicator); the first time you run the program, you will need to create a profile for yourself. Click on "New User"; you will be asked for a "user ID" -- a short string (no spaces) used to identify yourself (if you want it can be the same as your CS dept login) -- and your name.
After entering this information your profile will be created and you should see the main DLE interface. (Whenever you run the DLE after this, the ID you specified should show up in the pull-down menu under "Select a local user" in the login screen. Select your ID and click Login to run the client.)
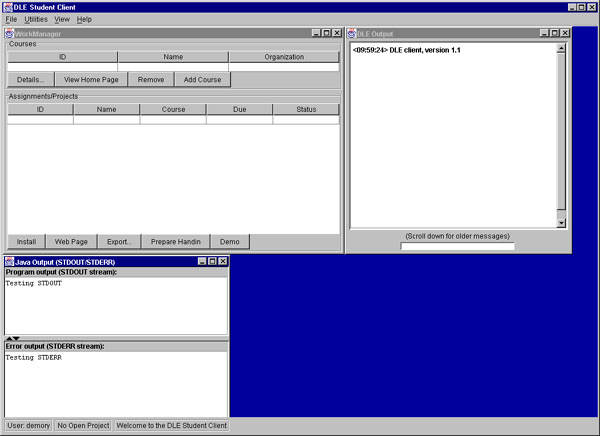
The DLE Client main interface is shown above. The window at the top-left, labeled "Work Manager," is what you will be using to install CS16 assignments on your machine. To its left is the "DLE Output" window, which will display any messages from the Client. (The other window is the Java output window. This will display all messages printed to the System.out and System.err streams; it is unlikely that you will need to refer to this.)
You will need to set up the DLE so that it knows you are taking CS16. In the WorkManager window, under "Courses," click on "Add Course." You will be prompted for the online location of the course data. The location for CS16, "loki.cs.brown.edu:8081/dl", should already be displayed here. If this is not the case, enter this string here, and click OK. You will then see a window displaying any courses found at this location. "cs016" should be the only entry listed. Click on this entry, then on the "Install Course" button. "cs016" should now show up as an entry in the "Courses" list in the WorkManager. Click on this entry and all assignments found for CS16 will be listed under "Assignments/Projects".
Run the DLE client if it is not already running. In the WorkManager window, click on the "cs016" entry under "Courses". This will list all assignments for this course found on the server:
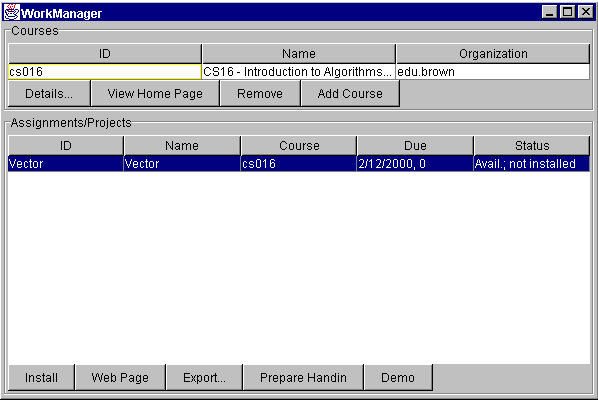
Now, select an assignment from the "Assignments" list, and click on the "Install" button. This will copy all of the files needed to complete the assignment (including the Java stencil and, for home users, support code libraries) to your account/computer. You should see a flurry of messages in the "DLE Output" window, with occasional pauses as larger files are downloaded. Once the process is complete, the "status" entry in the assignments table should change from "Avail; not Installed" to "Installed Locally."
The assignment "Install" process does the following:
~/dle/users/[your-user-id]/courses/cs016/asgn/[assignment]
c:\[dle-home]\users\[your-user-id]\courses\cs016\asgn\[assignment]
compile file (compile.bat on Windows): run this to compile your code using the "javac"
compiler
run file (run.bat on Windows): run this to execute your program with the Java virtual machine.
There are several assignment functions, located along the bottom of the Work Manager Frame, that will be useful in the Sunlab:
run and compile
executables and assignment code through the shell.
There are two options for working at home:
Using a Text Editor and the Run/Compile batch files
This most closely resembles the process for working on assignments that you are familiar with from the Sunlab. It involves using a text editor along with the javac and java utilities to edit, compile, and test your programs.
You may use any text editor you like; the default Windows "Notepad" will work, though there are a number of more powerful ones available as shareware.
The compile.bat and run.bat files described above will be used to compile and
execute your program. compile.bat will open a DOS prompt and run javac
on all of the java files found in the assignment directory. Any errors
will be displayed in this DOS window. run.bat will also open a DOS
window invoke the main class. All runtime errors will be
displayed here.
Using the Visual J++ IDE
If you have Microsoft's Visual J++ IDE installed on your system, you may use this as an alternative to working with a text editor. After installing an assignment in the DLE Client, click on "Export..", select "Visual J++", and a J++ project file (".vjp" extension) for the assignment will be created. You can then load this file in J++ and complete the assignment (i.e. create, compile and run classes) within the IDE. Make sure that any new files you create are located in the same directory as the existing stencil.
Once you have a program working on your home computer, you should transfer your code to your CS account so that you can recompile and run the program on a Sun before handing in. (Despite the hype, Java code does not always make the jump from one platform to another flawlessly). This may also be necessary to hand in your program. You should allow yourself some time for this step, as you need to be able to deal with any unexpected errors you may encounter when you first run your code in the lab.
The DLE client provides a function in the "Utilities" menu of the main client interface called "Zip User Data to File." This will write all of your local user data, including all source code, to a ZIP file. You can then use this file to transfer your work from home to the lab (or vice-versa). The client's login screen has a function "Load from File," that will extract a user data file to that particular installation of the client.
For specific handin instructions for an assignment, refer to the particular assignment's handout.
One DLE function that may be of use when you are ready to handin is the "Prepare Handin" feature. Located with the other assignment functions in the Work Manager frame, this will compress all of the java files for a selected assignment to a specified ZIP file. (It is similar to the "Zip User Data to File" function described in the previous section, except that it only affects the data for a single assignment.) Typically, the handin procedure for CS16 assignments will involve zipping the code and using a secure web page to hand in this file.